Manuals & Quick Start Guides
The Enchanted Portal is your interactive view to the tropical world outside your tiki bar. Trigger effects on the portal by using the Relic Amplifier and the various relics.
WARNING:
- Keep the Enchanted Portal away from water or liquid. Do not get wet!
- Keep the Enchanted Portal out of direct sunlight in a cool location with airflow.
- Never open the case or remove the SD Card from the Enchanted Portal. This will damage the device.
- Never plug anything into the USB ports on the end of the Enchanted Portal. This can damage the device.
- Do not drop the Enchanted Portal
Not properly following these guidelines will void the product warranty.
DO NOT PLUG THE POWER CABLE INTO AN OUTLET UNTIL INSTRUCTED TO DO SO
Plugging cables into the Enchanted Portal
Plug the included HDMI adapter and power supply into the indicated ports on the side of the Enchanted Portal.
NOTE: The plugs should both easily insert with a gentle push. DON'T FORCE THEM! While the power supply may be inserted in either direction, the HDMI adapter will only insert in one direction.

Figure 1

Figure 2. Enchanted Portal Front View
NEVER plug anything into any of the ports on the front of the Enchanted Portal. It will void the warranty.

Figure 3. Enchanted Portal Rear View
NEVER touch or attempt to remove the Micro SD card in the Enchanted Portal. It will void the warranty.
The power button can be used to turn ON/OFF the power if the provided power cable does not have a rocker switch inline. READ THE SECTION ON HOW TO PROPERLY POWER DOWN THE ENCHANTED PORTAL BEFORE USING.
Plugging in the HDMI cable to the monitor
Plug an HDMI cable (not included) from the HDMI adapter to your monitor. When the Enchanted Portal boots, your monitor should automatically change to HDMI (1080p) if your monitor supports that display resolution. If for any reason your monitor does not automatically change to 1080p, consult your monitor's User Guide.
Power on your monitor. This should be done BEFORE(or just a few seconds after) powering on the Enchanted Portal or the displayed scene on the monitor may appear in a letter-box format(i.e. not full screen).
On your monitor, set the proper input based on whichever input you used
on the back of your monitor. (Refer to your monitor's User Guide to set the proper input.).
Powering on the Enchanted Portal
Plug the provided power supply into a 120v outlet.
If your power supply has an inline rocker switch on the cord, press it to turn power on.
If your power supply does NOT have an inline rocker switch on the cord the power should turn on automatically. If it does not, gently press and release the power button on the device(See Figure 3 above).
A few seconds after the Enchanted Portal is turned on, the Tikibar.tech logo
should appear on a black screen. A few seconds later the Enchanted Portal logo should appear full screen on a white
background and then the Enchanted Portal scene will fade into view as shown in Figure 4 below.

Figure 4
If the image on the screen appears with any border around it, such as shown in Figure 5 below, the likely cause is that the monitor was turned on AFTER the Enchanted Portal and thus did not receive the correct resolution request from the portal device.

Figure 5
You can either set your monitor to 1080p resolution via the monitor remote or menu system (see your monitor User Guide), or you will need to power down the Enchanted Portal (see proper power down procedure below) and then power it back up.
Shutting down the Enchanted Portal
The Enchanted Portal was designed with tiki bars in mind. That is, connected to a single power source that turns the entire tiki bar ON/Off whether it be on a timer based system or a simple switch. That being said, just like a computer, the possible power surge associated with this type of system MAY, over time, shorten the life of the components. If possible, following the below POWER DOWN procedure can help mitigate that possibility.
To properly shutdown the system follow these steps:
- Use the SHUTDOWN card on the Relic Amplifier OR press and hold the power button on the Enchanted Portal device (see Figure 3 Above) for about 5 seconds.
- Wait for the GREEN light on the bottom of the Enchanted Portal (see Figure 3) to stop blinking and turn SOLID RED. This should take less than 10 seconds.
At this point your Enchanted Portal is powered down. The solid RED LED(see Figure 3) indicates the device is still plugged into power. You may leave it in this state if you wish.
If your power cable has an inline rocker switch you may click the rocker to completely disconnect from power.
If you power cable does NOT have an inline rocker switch, unplugging the cable will completely disconnect from power. NOTE: PRESSING THE POWER BUTTON WILL TURN THE POWER BACK ON if your cable does NOT have an inline rocker switch.
If your power supply has a rocker switch but you unplugged or turned off power via some other method, you will have to remember to flip the rocker switch OFF and then ON again in order to restart the device.
Mounting on the Wall
While mounting is NOT recommended, if you choose to do so NEVER USE METAL OR ANY CONDUCTIVE MATERIAL INSIDE THE MOUNTING HOLES!
Conductive material inside the mount holes may touch the circuit board and cause a short, destroying The Enchanted Portal and voiding the warranty. If you choose to use the mounting holes use plastic, non-conductive mounts and use extra caution when inserting them into the mounting holes.
Instead of the mounting holes, using a plastic mounting strap or other device that does not require putting anything inside the mounting holes is another option.
In either case you can find items like this on Amazon or other sites.

Enchanted Portal Case Bottom View
Trouble Shooting
The Relic Amplifier is your gateway to triggering effects on the Enchanted Portal. Just place a relic on the amplifier and see what happens!
Version 2.0 of the Tiki Head design will be available soon. If you have version 1.0 and wish to upgrade when it becomes available please send an email to info@tikibar.tech and let me know.
4 AA Battery Version
- Remove the battery cover and insert 4 AA batteries (not included).
- Replace the battery cover. Do not force it. It can be tricky to properly align. It should snap closed easily.
- Slide the switch on the battery box to the ON position. The diamond on the top of the Relic Amplifier should turn BLUE. If it immediately turns RED rather than BLUE, try sliding the switch back to OFF and then back to ON. (See the FAQ for more LED Status Indicator information).
USB-C Powered Version
Plug the supplied USB-C power cable into a battery pack or outlet adapter
and plug the other end into the Relic Amplifier.
The diamond on the top of the Relic Amplifier should turn BLUE. If it immediately turns RED rather than BLUE, try unplugging the cable FROM THE BATTERY and plugging it back in. If the diamond continues to immediately turn RED, make sure both ends of the cable are securely, but gently, pushed in.
NOTE: When removing the cable from the Relic Amplifier, pull gently, holding your fingers immediately
above and below where the cable inserts. This will lesson the chances of yanking the USB-C plug from the Relic Amplifier.
Once powered on the diamond on the top of the Relic Amplifier has the following meanings:
- IMMEDIATELY SOLID RED
Insufficient power. Try unplugging or turning off and then immediately plugging in or turning on. This should provide enough power. See the FAQ for more details.
- SOLID BLUE
Searching for the Enchanted Portal
- BLINKING RED then SOLID RED
The Enchanted Portal could not be found. Make sure it is on and running.
- BLINKING GREEN then PULSING GREEN
The Enchanted Portal was found and the Relic Amplifier is ready for use.
Placing a Relic on the Amplifier
When a relic is place on the tiki head mouth the jewel on the forehead will blink to indicate the item is recognized. A few seconds later the jewel should blink GREEN indicating the Enchanted Portal was reached and the effect should start. If the jewel blinks RED it indicates the Enchanted Portal could NOT be found. If your portal is on try turning the power on the relic amplifier OFF and then back ON to make sure it can find it (see above for connection information indicators).
Version 2.0 of the Relic Amplifier, at present this is the Stone Temple design, can be powered in two different ways.
USB-C POWER
Plug a USB-C cable into the back of the device. You should see a tiny RED LED show up through the side of the stone above the plug to the right. The light may blink and this simply indicates power is connected to the device.
NOTE: USB-C to USB-C cables may not power up the device. Basically consider the relic amplifier a dumb device, as opposed to your smart phone which will trigger the USB-C cable to begin charging when plugged in. If you find this to be the case try using a USB-A to USB-C cable like the one shown below.

USB-A to USB-C cable
To power on the device press in the button on the side. The button should click and remain pressed in. The device will now power on.
To power OFF the device, press and release the button on the side. The button should pop out and the device will power off.
Rechargeable Battery Power
The device may also be powered by a 3.7v lithium ion rechargeable battery.
NEVER USER A BATTERY WITH MORE THAN 3.7v as it will damage the device.
To access the battery compartment unscrew the 2 screws on the bottom of the device. Use caution when you flip the device over so as not to bang the stone pillar or the clear flame at the top as this could damage them. Once the compartment is open there will be a JST-PH 2.0 type plug available . This is the most common plug type for batteries of this size but there are others. So when purchasing a battery be sure and look for JST-PH 2.0 and 3.7v. The mAh (milliampere-hour) of the battery only matters in that larger values provide longer life. For example a 5200mAh battery will last longer than a 3000mAh battery.
The size of the battery obviously matters as well. Be sure and get a battery small enough to fit inside the compartment, otherwise you may as well just use a large battery and connect to the USB-C port on the back. A battery with the following dimensions will fit with room to spare.
2.65 x 1.46 x 0.75 Inches
You can find batteries that meet these criteria on Amazon and other sites. Here is a link to one such battery.
IMPORTANT!!!! ALWAYS check that the RED and BLACK wires of the battery connector match. Installing a battery with the wires reversed will destroy the device!! See section below for more details.

If you receive a battery with the wires reversed it is quite easy to fix. Check out the FAQ->Relic Amplifier->Rechargeable Battery for instructions on how to swap the wires.
Once a compatible battery is plugged in, there is a tiny, hidden button on the back of the rocks on the far right above the USB-C port. Gently press the button to switch the device from USB-C power to battery power. You should see RED LEDs light up inside the rock. You will still need to press in the larger power button on the side to turn on the device.
Turning the device OFF and then ON again will return to the default USB-C power.
IMPORTANT: Before connecting a battery of this type always make sure the RED and BLACK wires match up. Some batteries come with the plug wires reversed (I know, it's annoying) and connecting a battery with the wires reversed WILL DAMAGE THE DEVICE. Unfortunately the battery description usually does not indicate in which configuration the wired connector is setup though many do show a picture (that may or may not be accurate). The connection on the Relic Amplifier is in the most common configuration. I have found on Amazon that reading other people's reviews of the battery they will often say something like "the wires are reversed on this battery so be aware of that" or something along those lines. Fortunately Amazon has a great return policy so if you get a battery that has the wires reversed you can return it and try again.
See the Battery FAQ for information on how to change the connector if you get one that is backwards!
Charging the battery
NEVER LEAVE THE BATTERY CHARGING OVERNIGHT
While the charging board has built-in functions to assure the battery does not overcharge, the last thing we want to happen is to ruin the battery or worse have it overheat and catch fire. Scary, yes, and it's not likely to happen, however better safe than sorry. If you leave the battery inside for a long time over many charges, open the compartment every now and again and inspect the battery to make sure nothing unusual is going on.
The battery will charge via the USB-C port on the device when it is plugged in. You may turn the relic amplifier on and use it while the battery is charging. There are 4 tiny red LEDs in the rock above the USB-C port (on the right). Each LED represents 25% charge and the current charging percentage LED will blink. E.G. if the battery is 50% charged and it is charging on the next 25% (50 - 75) the 3rd LED will be blinking. It is difficult to tell exactly which LED is blinking because of the location of the charging board, however you should be able to get a general idea.
Powering up the Relic Amplifier
Once the device is powered up the flame atop the pillar will turn solid BLUE. This indicates the device is searching for the Enchanted Portal. If the portal is found the flame will blink GREEN several times and then turn to flickering like fire. If the portal is NOT found the flame will blink a violet color several times and then return to a flickering flame. If you have powered on the amplifier BEFORE powering on the Enchanted Portal then you will need to cycle the power OFF and then ON on the relic amplifier.
The flame on the pillar will now react to all sorts of different things in different ways. For example if you change the time of day to sunset the flame will begin pulsing an orange color. If the volcano erupts the flame will pulse like lava. There are many different effects the flame will perform.
Placing a Relic on the Amplifier
When placing a relic on the amplifier you should place it towards the middle of the amplifier. If the relic is recognized then the flame will blink a light blue color several times. The flame will then turn solid blue while the Enchanted Portal is contacted. The flame will blink GREEN if the portal was contacted successfully or VIOLET if the operation failed for some reason. If the operation fails try it again and see if the same thing happens. If it does simply power the device OFF and then back ON and make sure the flame blinks GREEN to indicate the portal has been found.
Placing a Relic on the Amplifier
When placing a relic on the amplifier you should place it towards the middle of the amplifier. See the specifics of the amplifier you have (above) for details on what the different colors mean.
The Relic Amplifier Mini works best through about 1/2 inch of non-metallic material. E.G. wood or plastic. It will work through an inch or more of material however it is less reliable at that distance and may not always properly "read" the relic above it. Try holding a relic a few inches above the mini and slowly move it down until you see the lights blink, which indicates the relic was found. If the lights then blink RED this means the data from the relic was not properly transferred and you'll have to try again. Sometimes, when reading a relic from a distance the lights may blink GREEN(which usually indicates the relic was read and data transferred) however again, at a distance, this sometimes results in nothing happening and you may have to try again.
Mounting the Relic Amplifier Mini
WARNING:
NEVER DRILL INTO THE AMPLIFIER BOX OR DIRECTLY ATTACH ANYTHING TO IT!
If you need to mount the box beneath a shelf or under something that requires mounting, try using plastic straps or creating a small mounting platform from wood that the mini can slide into or rest on. There are some double-sided mounting tapes that may work, but understand if the tapes fail and the device falls to the ground it could break so we don't suggest this method. You can find various options on Amazon if you prefer not making something yourself.
As always if you have any questions please email us at info@tikibar.tech
Many relics have some subtle side-effects that may not be immediately obvious and may cause confusion. For example some effects have a time during which other relics are ignored. Familiarize yourself with the special considerations for each relic for a better Enchanted Portal experience.
While the Day relic has no special considerations, both the Sunset and Night relics do. A torch lighting ceremony takes place when you switch to Sunset or Night, during which other relics are ignored. The sunset ceremony ends when all the torches are lit, while the night ceremony ends once the green light on the tiki hut lights up.
If you use a relic during the ceremony you may see an hourglass appear, indicating you will need to wait until the ceremony completes. Depending on the relic used, the effect may automatically trigger once the ceremony ends or you may have to use the relic again.
The volcano relic will make Mt.Tekkiowakka erupt during any time of day or weather. It is important to remember that once the volcano starts erupting it will remain in eruption mode and continue erupting about once every 5 minutes. To stop the eruption, change the time of day or weather. You can even change to the same time of day.
This is important because certain effects don't work during an eruption. You may try to explode the crate on the island, for example(using the Unstable Cargo or Unstable Tippy Cargo relic), but it won't work while the portal is in eruption mode.
When a storm is triggered it will take 30 or 40 seconds for the storm to roll in. First the clouds appear and then the wind picks up. Finally the rain comes. Until the rain begins, other relics will be ignored.
Betty, the lagoon's kraken, is a bit shy, and only comes out at certain times. Those times are:
- Daytime storm
- Sunset storm
- Night time clear skies
The kraken sequence can last over a minute and takes 10 or 20 seconds before the kraken will appear, so be patient. During the effect other relics will be ignored.
The Unstable relics can create a number of different explosions based on the time of day.
- Day - Barrel in the river and barrel in the rocks
- Sunset - Barrel in the river, barrel in the rocks, crate on the island, falling barrel
- Night - Barrel in the river, crate on the island, falling barrel
NOTE: During a volcanic eruption only the barrel in the river and the falling barrel will work. During a storm explosions will not work at all (because of all the rain, of course).
What is an Interactive Relic?
In addition to the interaction with the Enchanted Portal noted above, an Interactive Relic can trigger effects on other interactive relics. For example knocking on one crate can trigger an effect (flashing lights, rumbling) on another crate, on the Mystic Aurora LEDs, or even on the relic Amplifier V2.0. One relic can effect many other others and even have a "conversation" of sorts.
At the moment the current interactive relics include: Unstable Cargo, Unstable Tippy Cargo, Mystic Aurora LEDs, and the relic amplifier V2.0. Upcoming interactive relics include a model plane, pirate ship wheel, a smoking desktop volcano, and more!
The Unstable Cargo crate will flash and rumble as well as cause crates and barrels on the Enchanted Portal to explode. Over a dozen knock sequences(see below) will cause all sorts of havoc. These sequences range from relatively easy to difficult and it will take some time to master the nuances of some of these knocks.
Quick Start - No Batteries
Place the side of the crate that says Tikibar.tech face down on your relic amplifier (the Tiki Head or the Stone Alter). If you don't immediately see the light blink, as it should when a relic is recognized, move the crate around a bit until it does.
This will create a random explosion on the Enchanted Portal. Since there are a variety of explosions and some are dependent on the time of day, the random explosion chosen may not be compatible with the current time of day. So if nothing happens simply pick up the crate and place it back down. Eventually it will pick a random explosion compatible with the current time of day on the Enchanted Portal and something will happen.
Powering on the Crate
Insert 4 AA batteries into the bottom and replace the battery cover. Slide the switch to the ON position. The TNT should blink blue a few times and then turn solid blue. This indicates the crate is searching for the Enchanted Portal.
- If the portal is found the TNT will blink GREEN and then change to a pulsing greenish color.
- If the portal is NOT found then the TNT will blink RED and then turn solid RED.
When the crate is first powered on it will always look for the Enchanted Portal and enter DEFAULT MODE. (See Modes and How to Use Them below)
IMPORTANT: This little crate has a lot going on and requires all the power it can get. Fresh batteries are essential for optimal performance. When the batteries begin to deplete you may notice that the crate works for a few minutes and then becomes slow to react or stops reacting. Also the vibration will become significantly less. When this happens you can, of course, just turn the crate off and back on to reset it and continue to use it for a few minutes and this may be perfect for you. However it's probably time to replace the batteries when it starts misbehaving. Using rechargeable batteries might work but be aware they tend to deplete faster and over time, even at full charge, don't always supply optimal power. If you plan to use rechargeable batteries you will just have to experiment and see how long they last.
How to Knock
You really can knock just about anywhere on the crate but the top works best. Picking the crate up and tapping a bottom corner or bottom edge (lightly) on a solid surface seems to work really well as does dragging the top of your fingernail or the end of a spoon across the top. Avoid knocking on the sides with the glowing TNT as well as the battery box on the bottom, but the other sides are fine. You'll have to experiment to see what works best for you.
The key to a successful knock is to notice that the TNT will blink a dark blue if your knock is heard. Often times the first knock will not be recognized so keep knocking/dragging until you see the TNT blink dark blue and then, without pause, continue your knock sequence.
Once the first knock registers, subsequent knocks will register with a much lighter touch. Play around with this idea until you get the feel for it.
For example let's say you drag your finger across the top and nothing happens. Try it again and again until you see the TNT blink blue. That first blink is the first knock in whatever sequence you are doing. So if you are doing "1 2 3 4 5" that first blink is the "1" so just continue without pause the remainder of the sequence.
DON'T GET YOUR CRATE WET! If you need to clean it for any reason use a soft, damp cloth.
How Are Knock Sequences Recognized?
Knock sequences are recognized by the cadence of the knock, not how loud or soft they are. That is, if the sequence is "knock knock knock" and you do "knock (long pause) knock (long pause) knock" then the sequence will not be recognized.
Let's use the well known "Shave and a Haircut, two bits" knock. Here is what a valid knock sounds like.
VALID "Shave and a haircut, 2 bits"
INVALID "Shave and a haircut, 2 bits"
(two examples)
Notice that even though the same number of knocks occur in both examples, the rhythm is not the same. This example is obvious when you hear it, but you will find that even a knock that sounds correct to your ear may not be recognized. While there is a small area of forgiveness, if the pause between knocks is even one-half second to long or short then the sequence may not be recognized. If your knock is not recognized and it sounds correct to you, try speeding up your knock just a tiny bit or slowing it down just a tiny bit. Usually speeding it up helps more than slowing it down, but try both.
PRACTICE MAKE PERFECT!
It's going to take a little while to get the hang of things and learn how to hone your knocking skills. Start with the easy knocks first and work your way into more difficult ones. Listen to the examples and try and duplicate them. If the knock is duplicating a song try singing the song as you knock it.
If you purchased the Unstable Cargo Relic PRIOR to April 2025 you have Version 1.0. If you are interested in upgrading to Version 2.0 please send an email to info@tikibar.tech
The Unstable Cargo relic has 4 different modes. You can change modes by knocking a certain sequence. Each mode has different usages so familiarize yourself with each mode. The knocks for each mode are presented here but there are actual examples at the end of the Knock Sequences section.
NOTE: From Portal Mode you can easily switch to any of the other modes by knocking the required sequence. Once in a mode OTHER than Portal Mode, it's easiest to just cycle the power off and on and then enter the desired mode. While it's possible to switch to other modes when NOT in Portal Mode, there are cases when this won't work.
PORTAL MODE
This is the mode that the crate goes into when the power is first turned on. It is likely the mode that you will use the most. To return to this mode from any of the other modes it's easiest just to turn the power off and then back on again.
In this mode when a recognized knock sequence is performed the crate will blink and flash different colors as if sparking and exploding, and it may even vibrate. Additionally if the Enchanted Portal is currently running then an explosion effect will be triggered on the portal.
GAME MODE
In this mode the crate will pick a number from 3 to 10. Players make a guess by knocking the number of times they think is correct.
Entering Game Mode
To enter game mode you must knock the following sequence:
K...K.K...K.K.K.K...K.K...K
That is 1 knock (long pause) 2 knocks (long pause) 4 knocks (long pause) 2 knocks(long pause) 1 knock
Remember, a "long pause" is still less than a second but close to a second. If the knock is successful the crate will do the following:
- Cycle through rainbow colors. This rainbow cycle will be used whenever the mode of a relic changes.
-
- If the Enchanted Portal is turned on the time of day will switch to either sunset or night and the crate will blink BLUE. This is because the game mode explodes the crate on the island which is only available during sunset or night.
- If your portal is NOT turned on the crate will blink RED indicating it could not find the portal.
- The crate will blink BLUE then GREEN then PURPLE. This indicates a number has been chosen and it is ready to accept guesses.
Playing the Game
Once the crate has chosen a number simply knock your guess, from 3 to 10, on the crate. Knocks less than 3 will be ignored so if you mess up just stop before your 3rd knock and then try again. Just a regular knock like you were knocking on a door. For example if your guess is 5 then KNOCK.KNOCK.KNOCK.KNOCK.KNOCK .
If you guessed correctly the crate will then flicker and spark in reds and yellows like it is exploding. If the Enchanted Portal is active the crate on the island will explode. The crate will then blink BLUE and then GREEN and then PURPLE to indicate it is picking a new number.
If you guessed incorrectly the crate will flash a series of light, purple colors that travel around the inside of the crate.
In either case the crate will then return to the pulsating green flicker which indicates it is ready for someone to knock on it.
NOTE: The number will not change after an incorrect guess. It is the same number until someone guesses it correctly.
INTERACTIVE MODE
In this mode the crate will look for all interactive relics that are in INTERACTIVE PAIRING MODE. When it finds one it will request to control it as well as allow it to control this relic. Once it finds all available relics a knock sequence will trigger effects in other relics.
Let's use 2 crates as an example. We will call them crate A and crate B. Crate B is placed into INTERACTIVE PAIRING MODE(see below). By doing so it will broadcast its name for other relics to find. Now crate A is placed into INTERACTIVE MODE. Crate A will find crate B and request access to control it. Crate B will respond, also requesting access to control crate A. Once all the virtual handshaking is done you can knock on either crate and effect the other.
At the moment this isn't super exciting, but there are more interactive relics coming that will allow sorts of fun interactions.
Entering Interactive Mode
To enter interactive mode you must knock the following sequence:
K.K.K.K.K.K...K...K.K.K...K
That is 6 quick knocks (long pause) 1 knock (long pause) 3 quick knocks (long pause) 1 knock
Remember, a "long pause" is still less than a second but close to a second. If the knock is successful the crate will do the following:
- Cycle through rainbow colors. This rainbow cycle will be used whenever the mode of a relic changes.
- The TNT will turn a yellow color. This indicates the crate is looking for other relics. If it finds one and successfully links with it the TNT will flash purple and the relic it has linked with will cycle through rainbow colors. If there are more relics to talk with the TNT will turn yellow again and so on.
- Once all relics have been found and connected the TNT will return to a pulsating green color.
All connected relics are now ready to be knocked on to trigger effects on other relics.
INTERACTIVE PAIRING MODE
In this mode the crate will broadcast itself so that other interactive relics can find it. Once another relic finds it this crate can be knocked on to trigger effects on other relics. Think of this as a PAIRING mode similar to Bluetooth Pairing.
Entering Interactive Pairing Mode
To enter interactive pairing mode you must knock the following sequence:
K.K.K.K.K...K.K.K.K...K.K.K...K...K
That is 5 quick knocks (long pause) 4 quick knock (long pause) 3 quick knocks (long pause) 1 knock (long pause) 1 knock
Remember, a "long pause" is still less than a second but close to a second. If the knock is successful the crate will do the following:
- Blink BLUE twice
- Cycle through rainbow colors. This rainbow cycle will be used whenever the mode of a relic changes.
- Return to the pulsating green color.
All connected relics are now ready to be knocked on to control other relics.
If you purchased the Unstable Cargo Relic AFTER April 2025 you have Version 2.0.
Version 2.0 of the Unstable Cargo relic has 2 different modes: Portal mode and Game mode. You can change modes by knocking a certain sequence. All the interactive features available in Version 1.0 have been automated and are on as soon as the crate turns on.
PORTAL MODE
This is the mode that the crate goes into when the power is first turned on. It is likely the mode that you will use the most. To return to this mode from any of the other modes it's easiest just to turn the power off and then back on again.
In this mode when a recognized knock sequence is performed the crate will blink and flash different colors as if sparking and exploding, and it may even vibrate. Additionally if the Enchanted Portal is currently running then an explosion effect will be triggered on the portal.
The Interactive features of the crate are also triggered in this mode (previously there was a separate mode for this). For example when a knock is recognize and the crate is "exploding", if the Mystic Aurora LED strip is on, it will flicker and flash as if exploding as well. Additionally if you have version 2.0 of the relic amplifier (the Temple design or the coming soon updated tiki head design) the crate will react to changes in the portal. For example if the time of day changes to sunset then the color of the TNT lights will change to orange.
Returning to portal mode from Game Mode
The easiest way to return to portal mode is simply to cycle the power OFF and then back ON. However there is a knock that will return the crate to portal mode. That knock is morse code for S.O.S. See the Mode Changing Knocks at the end of the knocks section.
GAME MODE
In this mode the crate will pick a number from 3 to 10. Players make a guess by knocking the number of times they think is correct. Be sure and see the TNT blink dark blue as that indicates it heard your knock. So if you knock 3 times but it only blinked the 2nd and 3rd, then you only guessed 2. So don't start counting your knocks until you see the first TNT blink dark blue.
Entering Game Mode
To enter game mode you must knock the following sequence:
K...K.K...K.K.K.K...K.K...K
That is 1 knock (long pause) 2 knocks (long pause) 4 knocks (long pause) 2 knocks(long pause) 1 knock
See and hear knock sequence examples in the Knock Sequences section.
Remember, a "long pause" is still less than a second but close to a second. If the knock is successful the crate will do the following:
- Cycle through rainbow colors. This rainbow cycle will be used whenever the mode of a relic changes.
-
- If the Enchanted Portal is turned on the time of day will switch to either sunset or night and the crate will blink BLUE. This is because the game mode explodes the crate on the island which is only available during sunset or night.
- If your portal is NOT turned on the crate will blink RED indicating it could not find the portal.
- The crate will blink BLUE then GREEN then PURPLE. This indicates a number has been chosen and it is ready to accept guesses.
Playing the Game
Once the crate has chosen a number simply knock your guess, from 3 to 10, on the crate. Knocks less than 3 will be ignored so if you mess up just stop before your 3rd knock and then try again. Just a regular knock like you were knocking on a door. For example if your guess is 5 then KNOCK.KNOCK.KNOCK.KNOCK.KNOCK .
If you guessed correctly the crate will then flicker and spark in reds and yellows like it is exploding. If the Enchanted Portal is active the crate on the island will explode. The crate will then blink BLUE and then GREEN and then PURPLE to indicate it is picking a new number.
If you guessed incorrectly the crate will flash a series of light, purple colors that travel around the inside of the crate.
In either case the crate will then return to the pulsating green flicker which indicates it is ready for someone to knock on it.
NOTE: The number will not change after an incorrect guess. It is the same number until someone guesses it correctly.
INTERACTIVE MODE
There is no longer a separate interactive mode as Portal mode is ALWAYS in interactive mode. Any knock sequence in Portal mode will automatically trigger any other interactive relics that are available. For example a knock that changes the time of day on the Enchanted Portal would also change the color of the Mystic Aurora LED strip. A knock that triggers an explosion might cause Captain Capsize to shout out in surprise.
NOTE that there are a few different sequences between V1.0 and V2.0 . If a version number is indicated (in RED) with the knock sequence then it is ONLY applicable to that version.
Here are the knock sequences and what each one does. Each example was performed on an Unstable Cargo crate and worked. Consider that there are essentially 3 different pause lengths between knocks:
- Quick - About 1/3 second. It's a normal, fast paced knock. If you're tensing to try and speed up your knock then you are doing it too fast.
- Medium - About 1/2 second.
- Slow - About 3/4 of a second.
Here are examples of Quick, Medium, and Slow knocks.
Slow, Medium, and Quick knocks
We will represent QUICK with =, MEDIUM with ==, and SLOW with ===.
When words to a song are presented each word, or in some case syllable, is a knock. The word is broken up into syllables if this is the case. If no pause is indicated it is assumed to be a quick pause.
It's also important to note here that the RESULT of each knock presented below is when the crate is in the default/portal mode. If the crate is in Interactive Mode the result is some effect triggered on other interactive relics. In the case of multiple crates, each knock equates to a different series of color flashes and rumbles in other crates. When more complex interactive relics are available their results will be noted here.
Shave and a haircut, two bits
KNOCK==KNOCK==KNOCK=KNOCK=KNOCK===KNOCK==KNOCK
Shave (med. pause) and (med. pause) a (short pause) hair (med. pause) cut (long pause) two (med. pause) bits
RESULT: Random Explosion
Note that since different types of explosions can occur during different times of day, it is possible that nothing happens. For example if the portal is set to DAY and the crate on the island explosion is randomly selected, nothing will happen because the crate will only explode during SUNSET and NIGHT.
5 quick (long pause) 4 slow (long pause) 2 quick (long pause) 2 quick
KNOCK=KNOCK=KNOCK=KNOCK=KNOCK==KNOCK===KNOCK===KNOCK===KNOCK===KNOCK=KNOCK===KNOCK=KNOCK
5 quick, 4 slow, 2 quick, 2 quick
RESULT: Barrel in the River Explodes
3 slow (long pause) 4 quick (long pause) 4 quick
KNOCK===KNOCK===KNOCK===KNOCK=KNOCK=KNOCK=KNOCK===KNOCK=KNOCK=KNOCK
3 slow, 4 quick, 4 quick
RESULT: Barrel in the Rocks Explodes
Yankee Doodle
KNOCK===KNOCK=KNOCK=KNOCK=KNOCK=KNOCK=KNOCK===KNOCK
I'm (long pause) a yan kee doo dle dan (long pause) dee
RESULT: Crate on the Island Explodes
1 (long pause) 4 quick (long pause) 1 quick (long pause) 4 quick (long pause) 1
KNOCK===KNOCK=KNOCK=KNOCK=KNOCK===KNOCK===KNOCK=KNOCK=KNOCK=KNOCK===KNOCK
1 (long pause) 4 quick (long pause) 1 (long pause) 4 quick (long pause) 1
RESULT: Barrel Falls of the Cliff and....wait for it....Explodes.
In the tiki tiki tiki tiki tiki room
KNOCK===KNOCK===KNOCK=KNOCK=KNOCK=KNOCK=KNOCK=KNOCK=KNOCK=KNOCK=KNOCK=KNOCK==KNOCK
In (long pause) the (long pause) ti ki ti ki ti ki ti ki ti ki (medium pause) room
You might recognize this rhythm if you have ever visited The Enchanted Tiki Room.
RESULT: Random Explosion
Dog Show!
KNOCK==KNOCK==KNOCK=KNOCK=KNOCK==KNOCK=KNOCK=KNOCK=KNOCK
1 (medium pause) 1 (long pause) 3 quick (medium pause) 4 quick
RESULT: River Barrel Explosion
This is called Dog Show because the rhythm is based on an old SNL skit. Here is a link to a YouTube video of the old Saturday Night Live skit where they do the rhythm.
Change the time of day!
KNOCK===KNOCK=KNOCK===KNOCK=KNOCK=KNOCK===KNOCK=KNOCK=KNOCK=KNOCK
1 (long pause) 2 quick (long pause) 3 quick (long pause) 4 quick
RESULT: Randomly change the time of day
NOTE: It's possible it randomly changes the time of day to the current time of day in which case nothing would happen.
(V2.0) MJB
KNOCK==KNOCK=KNOCK=KNOCK===KNOCK=KNOCK==KNOCK===KNOCK=KNOCK==KNOCK===KNOCK=KNOCK=KNOCK==KNOCK=KNOCK=KNOCK
Audio example coming soon....
1 (medium pause) 3 quick (long pause) 2 quick (medium pause) 1 (long pause) 2 quick (medium pause) 1 (long pause) 3 quick (medium pause) 2 quick
RESULT: Island crate explodes
3 Blind Mice
KNOCK==KNOCK==KNOCK===KNOCK==KNOCK=KNOCK=KNOCK===KNOCK=KNOCK==KNOCK=KNOCK=KNOCK=KNOCK=KNOCK==KNOCK=KNOCK
3 (med. pause) blind (med. pause) mice (long pause) see (med. pause) how they run (long pause) they all (med pause) run af ter the far mer's wife
RESULT: Crate Falls from Cliff and Explodes
NOTE: Each word of the song, or in some cases syllable, is a knock.
(V1.0) Yo Ho Yo Ho
KNOCK==KNOCK==KNOCK==KNOCK==KNOCK=KNOCK==KNOCK=KNOCK==KNOCK=KNOCK
Yo (med. pause) Ho (med. pause) Yo (med. pause) Ho (med. pause) a pi (med. pause) rates life (med pause) for me
RESULT: Explodes Barrel in River
NOTE: Each word of the song, or in some cases syllable, is a knock. This one sounds easy but is tough and is often falsely identified as the next knock, Hi Ho. So make sure it does what you expect.
(V2.0) Yo Ho Yo Ho
KNOCK==KNOCK==KNOCK==KNOCK==KNOCK=KNOCK==KNOCK=KNOCK==KNOCK=KNOCK
Yo (med. pause) Ho (med. pause) Yo (med. pause) Ho (med. pause) a pi (med. pause) rates life (med pause) for me
RESULT: Volcano on Enchanted Portal erupts
NOTE: Each word of the song, or in some cases syllable, is a knock. This one sounds easy but is tough and is often falsely identified as the next knock, Hi Ho. So make sure it does what you expect.
Heigh Ho Heigh Ho
KNOCK=KNOCK===KNOCK=KNOCK===KNOCK=KNOCK==KNOCK=KNOCK=KNOCK=KNOCK
Heigh Ho (long pause) Heigh Ho (long pause) its off (med. pause) to work we go
RESULT: TNT sparks RED instead of pulsating GREEN until next knock.
NOTE: When successful the TNT will start flickering shades of red as if sparking. It will continue doing this until you begin your next knock so don't wait for it to turn GREEN because it is not going to.
Gilligan's Island Theme
KNOCK===KNOCK==KNOCK==KNOCK==KNOCK=KNOCK=KNOCK==KNOCK==KNOCK===KNOCK=KNOCK==KNOCK=KNOCK=KNOCK=KNOCK==KNOCK==KNOCK
RESULT: Explode Rocks Barrel
(V2.0) 5-4-3-1-1
KNOCK=KNOCK=KNOCK=KNOCK=KNOCK===KNOCK=KNOCK=KNOCK=KNOCK===KNOCK=KNOCK=KNOCK===KNOCK===KNOCK
Audio example coming soon
5 quick(long pause) 4 quick (long pause) 3 quick(long pause) 1 (long pause) 1
RESULT: Island crate explodes
(V2.0) 6-1-3-1
KNOCK=KNOCK=KNOCK=KNOCK=KNOCK=KNOCK===KNOCK===KNOCK=KNOCK=KNOCK===KNOCK
Audio example coming soon
6 quick(long pause) 1 (long pause) 3 quick (long pause) 1
RESULT: River barrel explodes
MODE CHANGING KNOCKS
Default/Portal Mode
This is Morse Code for S.O.S.
KNOCK=KNOCK=KNOCK===KNOCK===KNOCK===KNOCK===KNOCK=KNOCK=KNOCK
S.O.S.
RESULT: Crate returns to Default/Portal mode and connects to Enchanted Portal to trigger explosions.
You really should never need to use this knock. Just turning the crate OFF and then BACK on is the easiest way to do this.
NOTE: If, by chance, the Game Mode has chosen the number 9 (which is the number of knocks in this sequence) when you knock this to change back to portal mode it will simply think you are guessing the number 9. This is why just turning it OFF and then back ON may be easier to switch back to Portal mode.
Game Mode
This is just a number sequence: 1 - 2 - 4 - 2 - 1
KNOCK===KNOCK=KNOCK===KNOCK=KNOCK=KNOCK=KNOCK===KNOCK=KNOCK===KNOCK
1 knock (long pause) 2 knocks (long pause) 4 knocks (long pause) 2 knocks (long pause) 1 knock
RESULT: Crate enters Game Mode.
(V1.0) Interactive Pairing Mode
This is just a number sequence: 5 - 4 - 3 - 1 - 1
KNOCK=KNOCK=KNOCK=KNOCK=KNOCK===KNOCK=KNOCK=KNOCK=KNOCK===KNOCK=KNOCK=KNOCK===KNOCK===KNOCK
5 knocks (long pause) 4 knocks (long pause) 3 knocks (long pause) 1 knock (long pause) 1 knock
RESULT: Crate enters Pairing Mode.
(V1.0) Interactive Mode
This is just a number sequence: 6 - 1 - 3 - 1
KNOCK=KNOCK=KNOCK=KNOCK=KNOCK=KNOCK===KNOCK===KNOCK=KNOCK=KNOCK===KNOCK
6 knocks (long pause) 1 knock (long pause) 3 knocks (long pause) 1 knock
RESULT: Crate enters Interactive Mode searching for relics in pairing mode.
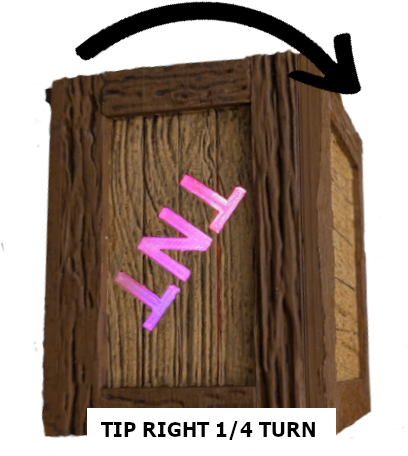
The Unstable Tippy Cargo crate will flash and rumble as well as cause crates and barrels on the Enchanted Portal to explode. Additionally it can change the time of day, cause the volcano to erupt, and event play a game! Ten unique tip sequences(see below) will cause all sorts of havoc. These sequences range from relatively easy to difficult and it will take some time to master the nuances of some of these sequences.
Quick Start - No Batteries
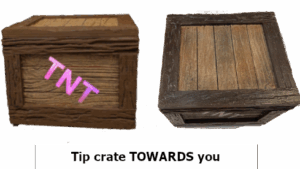
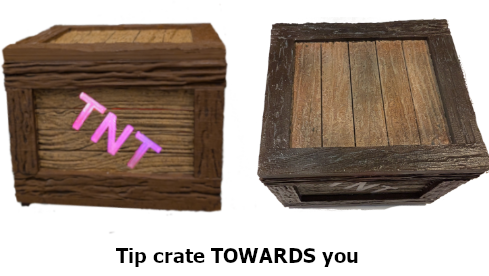
Place the side of the crate OPPOSITE the one that says Tikibar.tech face down on your relic amplifier (the Tiki Head or the Stone Alter). If you don't immediately see the light blink, as it should when a relic is recognized, move the crate around a bit until it does.
This will create a random explosion on the Enchanted Portal. Since there are a variety of explosions and some are dependent on the time of day, the random explosion chosen may not be compatible with the current time of day. So if nothing happens simply pick up the crate and place it back down. Eventually it will pick a random explosion compatible with the current time of day on the Enchanted Portal and something will happen.
Powering on the Crate
Insert 4 AA batteries into the bottom and replace the battery cover. Slide the switch to the ON position. The TNT should blink blue a few times and then turn solid blue. This indicates the crate is searching for the Enchanted Portal.
- If the portal is found the TNT will blink GREEN a few times and then go into resting state (see below) with no lights on.
- If the portal is NOT found then the TNT will blink RED. If this happens and the portal is, in fact, on, try powering it OFF and then ON again. If that still doesn't work try changing the batteries. (see trouble shooting in the FAQ)
IMPORTANT: This little crate has a lot going on and requires all the power it can get. Fresh batteries are essential for optimal performance. When the batteries begin to deplete you may notice that the crate works for a few minutes and then becomes slow to react or stops reacting. Also the vibration will become significantly less. When this happens you can, of course, just turn the crate off and back on to reset it and continue to use it for a few minutes and this may be perfect for you. However it's probably time to replace the batteries when it starts misbehaving. Using rechargeable batteries might work but be aware they tend to deplete faster and over time, even at full charge, don't always supply optimal power. If you plan to use rechargeable batteries you will just have to experiment and see how long they last.
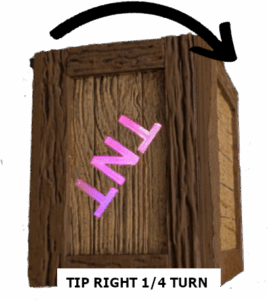
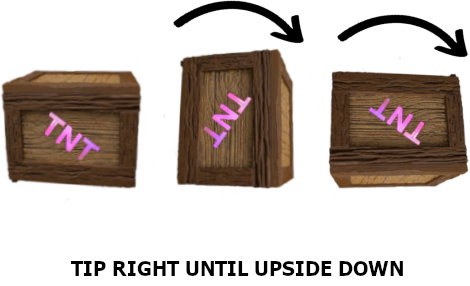
How to Hold the Crate for Tipping
Hold the crate with the side that says TIKIBAR.TECH to the RIGHT and TNT right side up and facing you. There's really only one way you can make that happen so hopefully you can figure it out. This is the starting position of every tip sequence, so if you make a mistake just return it to this position and hold it still for a few seconds until you see the TNT blink purple and blue and then go dark as that is the RESET indication.
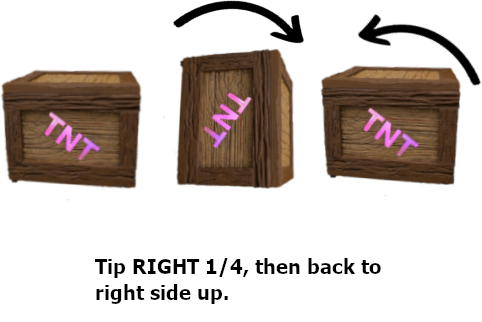
How to TIP the Crate
Each recognized TIP of the crate will result in TNT blinking green once. When tipping LEFT or RIGHT a full rotation will result in four blinks, one for each 1/4 rotation. When tipping the crate FORWARD (towards you) or BACKWARD (away from you) a full rotation will result in only two blinks, one for each 1/2 rotation. LEFT, RIGHT, FORWARD and BACKWARD remain the same regardless of the position the crate is currently in. E.G. if during a sequence the crate ends up upside down then right is still to the right, backward is still away from you, etc. Don't overthink it.
During tip sequences it will also help to keep the crate aligned such that the side facing you is flat and straight rather than at an odd angle. Think of each tip as ending with the crate sitting on a flat table top.
LEFT and RIGHT rotation is relatively forgiving with regards to the speed at which you tip. Don't try to tip with lightning speed, or snail slow, just somewhere in between. Practice tipping RIGHT until you see it blink green, then stop and tip it back to the upright position (it should blink green again). Try this for different speeds watching to make sure you always see the green blink.
FORWARD and BACKWARD rotation requires a faster tip for more consistent results. Additionally you should only see two green blinks for a full rotation, one for the first half until upside down, and one from upside down back to right side up. Try tipping the crate away from you slowly until upside down. If you saw two green blinks then you are tipping it too slowly so tip it back to upright position and then try again faster. Forward and backward definitely require a more speedy flip of the position.
A Successful Tip Sequence
When a successful tip sequence is completed the crate will blink green several times in rapid succession. The crate will then react in some predefined manner which may involve flashing, vibrating, blinking different colors or many other things. Additionally if the Enchanted Portal is available it might trigger an effect such as an explosion, time of day change, or even making the volcano erupt.
The crate will automatically reset a few seconds after it completes it's reaction.
Resetting the crate for a new tip sequence
Resetting the crate rotation sequence simply requires returning the crate to the starting position and holding it there until you see the lights blink purple (as in the above image) and then blue and then go off. The crate is now ready to begin a tip sequence.
DON'T GET YOUR CRATE WET! If you need to clean it for any reason use a soft, damp cloth.
Game mode allows each player to take a turn to try and make the crate explode. This is accomplished by shaking it (gently) or turning it upside down and then right side up or in any and every direction until it heats up and is ready to explode. The crate will heat up by blinking white then yellow then orange and finally red as you shake and/or tip it. Once it turns RED you can stop. The crate will then slowly grow brighter and brighter red and then one of two things will happen.
- If the crate explodes and vibrates then you win (or lose, you choose).
- If the crate starts fading dimmer and dimmer red and then goes dark, then you didn't make it explode.
If you made it explode then other things such as the Enchanted Portal and Mystic Aurora LEDs will also trigger effects and explode.
If you did NOT make it explode then the crate will blink purple and blue to indicate the next player's turn.
SHAKING THE CRATE HARDER OR FASTER HAS NO EFFECT ON THE PROBABILITY THAT IT WILL EXPLODE ON YOUR TURN. The crate has simply chosen a number from 1 to 10 and will explode when that number is reached.
Entering Game Mode
To enter game mode a certain tip sequence needs to be performed. Upon success the crate will pulse in rainbow colors to indicate Game Mode has initiated. When a game is completed simply wait until you see the rainbow pulse again which will indicate the start of a new game.
If you have the Mystic Aurora LEDs they will also pulse rainbow at the start of each game. Additionally they will explode when the crate explodes as previously mentioned.
The sequence required to enter game mode is as follows:
- From the starting position tip the crate away from you 1/4 turn. As mentioned in the Usage section, a quick flip works best for forward (towards you) and backward (away from you) rotations.
- Tip the crate towards you, back to the starting position.
- Roll the crate to the RIGHT all the way around (360 degrees) until it is back in the starting position. To give you an idea of speed, a full rotation such as this should take 3 or 4 seconds to perform.
Exiting Game Mode
To exit Game Mode just cycle the power OFF and then back ON again.
Always start a sequence with the crate in the starting position: TIKIBAR.TECH to the right and TNT right side up and facing you. Wait until you see the crate blink purple and then blue and then you can begin a sequence.
Try practicing on some of the easier sequences first until you have figured out speed and best practices for tips and rotations.
When a tip sequence has been completed successfully the crate will blink green several times and then perform whatever the associated effect might be.
Note that the first time a sequence is encountered in the instructions below some additional words of help are provided to remind you of best practices. Remember these as the next time those helpful words may not be presented.
Explode Barrel in the River
Tip the crate to the RIGHT all the way around 360 degrees. This FULL rotation should take 3 to 5 seconds to give you an idea of speed.
RESULT: During any time of day, if not storming, the barrel in the river will explode.
Explode Barrel in the Rocks
Tip the crate to the LEFT all the way around 360 degrees. This FULL rotation should take 3 to 5 seconds to give you an idea of speed.
RESULT: During day time or sunset the barrel in the river will explode
Crates on the Island Explode
- Tip the crate to the RIGHT 1/4 turn.
- Tip the crate LEFT back to the starting position.
- Finally roll the crate to the LEFT until it is upside down.
RESULT: During sunset and night the crates on the island will explode
Barrel Falls Off Cliff and Explodes
- Roll the barrel FORWARD (towards you) until upside down. Remember this type of rotation works better with faster movements, so quickly flip the crate to the upside down position.
- Continue in the same direction until the crate is back to the starting position. Again do it quickly.
- Roll the barrel LEFT all the way around 360 degrees back to the starting position. This should take 4 to 5 seconds.
RESULT: Barrel fall off the cliff by the waterfall on the left and explodes.
Erupt the Volcano
- Tip BACKWARD (away from you) until upside down.
- Tip to the RIGHT until right side up.
- Tip backward (away from you) until upside down.
- Tip LEFT 1/4 turn.
- Tip RIGHT 1/4 turn.
RESULT: Volcano on Enchanted Portal will erupt.
Make the Crate Rain
- Turn the crate FORWARD (towards you) until upside down.
- Turn the crate BACKWARD until right side up.
- Turn the crate BACKWARD until upside down.
- Turn the crate FORWARD until right side up.
RESULT: The crate will light up with splashes of blue, like rain drops. It will remain in this state until a new sequence is attempted.
Explode Barrel in River
- Tip LEFT 1/4 turn
- Tip RIGHT 1/4 turn
- Tip RIGHT 1/4 turn
- Tip LEFT 1/4 turn
- Tip LEFT 1/4 turn
- Tip RIGHT 1/4 turn
- Tip BACKWARDS until upside down.
RESULT: During any time of day, if not storming, the barrel in the river will explode.
Something Random
- Tip RIGHT until upside down
- Tip LEFT until right side up
- Tip LEFT 1/4 turn
- Tip RIGHT 1/4 turn
RESULT: Something random will happen. It could just be flashes of light in the crate, it could vibrate, something on the Enchanted Portal could explode, the Mystic Aurora could do something. You just never know!
Confetti
- Tip LEFT until upside down
- Tip RIGHT 1/4 turn
- Tip LEFT 1/4 turn
- Tip LEFT 1/4 turn
RESULT: Crate will light up like confetti colors. It will remain in this state until a new sequence is attempted.
Shake Shake Shake
- Shake the crate up and down, left and right, flip it upside down, turn it, shake it. Once you see the green blink about 7 or 8 times it will explode.
RESULT: The crate will explode and something random on the Enchanted Portal may or may not explode.
MODE CHANGING KNOCKS
GAME MODE
- Tip BACKWARD 1/4 turn
- Tip FORWARD back to starting position
- Tip RIGHT until upside down
- Tip RIGHT until right side up
RESULT: Switch to Game Mode. Crate should pulse rainbow colors
Always connect the LED strip BEFORE powering on the device. This will help prolong the life of the LEDs.
The plug hanging out of the Mystic Aurora is where the LED strip plugs into. NEVER PULL ON THIS PLUG. The wires connect inside and pulling could damage them.
To connect the LED strip to the device plug it gently into the RED/GREEN/WHITE cable. Make sure and line up each color wire with that coming from the Mystic Aurora as the plug will only insert in one direction. The plug should gently SNAP into place.
DO NOT FORCE THE PLUG INTO PLACE as you may damage it.
To disconnect the LED, grip the black connector on the LED side to hold it and then gently press down on the small rocker switch on the top of the connection. Pull the plug apart gently, rocking it back and forth slightly if needed. NEVER PULL BY THE WIRES! Use your fingers and only pull on the black, plastic plugs to get them apart.

Use only the provided 5v 4Amp power supply or one with the same power and amperage.
Powering on a single device
To power on the device simply push the barrel jack into the power jack on the side of the Mystic Aurora. The device will search the area for other Mystic Aurora and after about 6 or 7 seconds the LEDs should light up in their default state which is a sky blue color.
The first device you power up will become the MASTER device! See the section on multiple Mystic Auroras if you have more than 1 device.
Power on multiple devices
The process for powering up multiple devices only needs to be followed the first time, after that the order does not matter. You can connect all the devices to a single switch after this process is complete.
Power up the first device as described above. Once the LEDs come on in the their default sky blue color then the device is ready to go. Keep this first device powered up and power on a second device. Wait until the LEDs come on in their default sky blue color. Repeat this process for each device making sure to leave each one powered up. Once all your devices are powered on you are ready to go.
If you ever need to reset your devices to the factory settings to repeat this process, there are 2 ways to do this. See the section on Resetting Your Device.
There are 2 ways to reset your device to the factory setting.
Using the Reset Button on the Device
Power off ALL devices. With the device powered OFF, press and hold the button on the side. Power up the device while keeping the button pressed. After about 10 seconds the LEDs will light up in their default sky blue color. The device has now been reset and is the new Master device. If you have multiple devices repeat this sequence keeping each device powered on after it starts. Each subsequent device will become a slave to the Master device.
Connecting to the Device and Using the Factory Reset on the Control Panel
Connect to your master device as described in the section Connecting to the Mystic Aurora. Click the Clear Settings button and confirm the action. This will factory reset ALL powered on Mystic Aurora devices after which you will need to power everything off and then follow the Powering Up One or More Devices section above .
The Mystic Aurora does not understand WPA3 security. If you have your phone/tablet setup to use ONLY that you will not be able to connect. WPA2 security is usually setup as a backup automatically on your phone or tablet, but if you have problems this is the first thing you should look into. Additionally if you have a firewall setup that could block your connection or ability to view the web page served. See the FAQ for more details if you have problems connecting.
Make sure your device or devices are powered on. On the device you wish to use to connect, open the WiFi settings. Look for a device called mystic_aurora . If you have multiple devices you may also see mystic_aurora_1 and so on. You want to connect ONLY to the master device which is the one without any number in the name.
The password to connect to the device is iatbt24127 or iatbt25127
Enter the password and click Connect or whatever your device says. After about 6 to 10 seconds you should be connected, however you will notice that your connection is probably still spinning and spinning for about 30 seconds. This is because the device is looking for the internet which it will never find. Eventually the connection will time out and say something like "Connected, no Internet available" which is exactly what you want. Just know that after about 6 to 10 seconds you are connected to the device and can continue.
Open a browser on whatever device you just connected with and type in one of the following in the URL:
- 172.27.1.180
- mystic_aurora.local
The first option should always work much more quickly than the second. Depending on the settings in your browser the second option may not work at all. If you connect your Mystic Aurora to your home WiFi only then will mystic_aurora.local be the easier way to connect.
In your browser you should see a web page for the Mystic Aurora control panel. Here you can set the default startup effect, change the color, or start various effects. Play around with it and see how it works.
Remember that anything you do on the Master device will also sync to all other Mystic Aurora devices.
Tippy TNT is essentially the Unstable Tippy Cargo that DOES NOT interact with the Enchanted Portal. It will interact with other interactive relics like the Mystic Aurora or other crates. Unlike the Unstable Tippy Cargo, you can connect your phone/tablet to Tippy TNT and trigger effects and set defaults.
Insert 4 AA batteries into the crate and then turn it on. It should blink BLUE a few times and then go dark. It should then blink and possibly rumble as if exploding. Then it will go dark again. Tippy TNT is now in resting state. This state will randomly do an explosion sequence about every 45 to 90 seconds. There are a number of different sequences it will randomly cycle through.
You can pick up the crate and shake or tip it at any time. You will see it blink GREEN when you do this. See the QUICK TIP GUIDE and TIP SEQUENCES below for more details.
Setting the crate down and letting it sit will always return it to resting state.
When tipping LEFT or RIGHT, a complete rotation will result in the crate blinking GREEN 4 times, once for each 1/4 turn.
When tipping TOWARDS YOU or AWAY FROM YOU a complete rotation will result in the crate blinking GREEN only 2 times, once for each 1/2 turn.
Note that tipping TOWARDS or AWAY from you should be done quicker than when tipping LEFT or RIGHT. Not stupid fast, but a bit quicker will give better results when tipping TOWARDS/AWAY . Slow it down a bit when tipping LEFT/RIGHT.
GAME MODE
In Game Mode each player shakes the crate to make it spark. Enough sparks and it will start to heat up. If it heats up enough it will explode and that player looses. Or wins! Or takes a drink! Make up whatever rules you like.
Entering Game Mode
Perform the following TIP SEQUENCE to enter Game Mode. Always start a TIP SEQUENCE with the TNT facing you and the TIKIBAR.TECH letters on the right hand side.
- TIP AWAY FROM YOU 1/4 TURN (relatively quickly)
- TIP BACK TO UPRIGHT (relatively quickly)
- TIP LEFT or RIGHT ALL THE WAY AROUND (medium speed)
If performed properly the crate should fade through a rainbow of colors to indicate GAME MODE is starting.
Playing the Game
Shake the crate. As you shake it will start to flash. First WHITE, then YELLOW, then ORANGE, and finally RED. When it flashes RED stop shaking. The RED will intensify as the crate heats up. It will then either EXPLODE or the RED will cool down and disappear.
When the crate blinks PURPLE a few times it is the next players turn.
Exiting Game Mode
Cycle the power OFF and then ON to return to normal mode.
TIP SEQUENCES
Always start each TIP SEQUENCE with the crate TNT facing you and the TIKIBAR.TECH letters on the RIGHT.
The speed at which you tip should NOT be too slow. In fact tipping AWAY FROM and TOWARDS you should be done relatively quickly, while LEFT and RIGHT tipping is better off performed a little bit slower.
While you tip the crate will blink GREEN when it recognizes a tip. Try tipping the crate to the LEFT and you will notice it blink GREEN. If you were to roll the crate entirely around to the LEFT or RIGHT you will see the GREEN BLINK 4 times, once for each 1/4turn. If you roll the crate AWAY or TOWARDS you, you will only see the GREEN BLINK 2 times, once for each 1/2 roll.
When a TIP SEQUENCE is performed correctly the crate will blink GREEN several times and then do a lighting effect.
THE JUGGLE
THE CHASE
HOLIDAY
WAVES (difficult)
THIS IS HALLOWEEN (medium difficulty)
EXPLOSION 1
There are several different ways to perform this action
Option 2
GAME MODE
See the Game Mode section
GREEN FIRE
CLEAR WIFI SETTINGS
It's possible that something strange happens and although the crate is connected to your WiFi you are unable to reach it for some reason. It should NEVER happen, but it NEVER is a relative term in the world of magical tech gadgets. If you need to clear the WiFi settings because you are unable to connect you can use this TIP SEQUENCE.
Connecting to Tippy TNT will allow you to trigger some effects from your phone/tablet as well as set the resting mode to something other than the default.
Turn on the Tippy TNT. Open your WiFi settings and look for tbt_tippytnt. Choose tbt_tippytnt and then click Connect.
Use the password: iatbt25127
Wait about 10 seconds. It is likely you will continue to see the connecting... message, but by this time you have already connected. The connection is looking for the internet which it will never find because the Tippy TNT is NOT connected to WiFi so you can move on after about 10 seconds.
Open a browser and type in the following IP address in the URL
172.27.1.30
It may take a few seconds to display the TIPPY TNT console. The bottom of the console should have a copyright notice. If you do not see that it is possible the complete console did not load. Try hitting the REFRESH button on your browser.
Firewalls or security settings may cause issues when connecting or when loading the console. See the FAQ for more information on how to solve these issues.
Load the console by following the section above on Connecting Directly to Tippy TNT.
Once you have the console displayed, enter your Network name and Password into the WiFi section at the bottom of the console and save the information. Then power the Tippy TNT OFF/ON.
The crate will blink GREEN a few times if successfully connected to your WiFi. It will blink RED if it was unable to connect. In this case follow the directions in Connecting Directly to Tippy TNT to see if an error is shown. Most likely you just typed in the Network name or Password incorrectly and you should type them in again.
Once successfully connected to WiFi, open up a browser and type in
tbt_tippytnt.local
and then hit return. The console should load. It may take a moment for the page to load.
If the page does not load and you receive an error, check the FAQ for more information. You may also try typing in the IP address instead of tbt_tippytnt.local (see below).
Viewing the Console via IP ADDRESS
If your phone/table is not resolving the tbt_tippytnt.local name you may need to use the IP address instead. To do this, open your WiFi settings and look for the network tbt_tippytnt_XXX where XXX will be an IP address of the form 192.168.1.55 (number will vary). Type in the full XXX number exactly as shown into the URL of your browser. Type ONLY this number and nothing else.
If you are still unable to see the Tippy TNT console, consult the FAQ on connecting to relics.