
Mystic Aurora LEDs Guide
Power on the Device
Connecting the LED Strip
Always connect the LED strip BEFORE powering on the device. This will help prolong the life of the LEDs.
The plug hanging out of the Mystic Aurora is where the LED strip plugs into. NEVER PULL ON THIS PLUG. The wires connect inside and pulling could damage them.
To connect the LED strip to the device plug it gently into the RED/GREEN/WHITE cable. Note that some cables may be RED/GREEN/BLACK. Make sure and line up each color (or at least the RED/GREEN) wire with that coming from the Mystic Aurora as the plug will only insert in one direction. The plug should gently SNAP into place.
DO NOT FORCE THE PLUG INTO PLACE as you may damage it!
To disconnect the LED, grip the black connector on the LED side to hold it and then gently press down on the small rocker switch on the top of the connection. Pull the plug apart gently, rocking it back and forth slightly if needed. NEVER PULL BY THE WIRES! Use your fingers and only pull on the black, plastic plugs to get them apart.
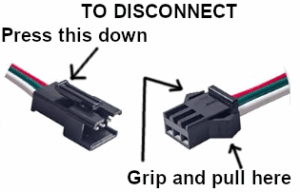
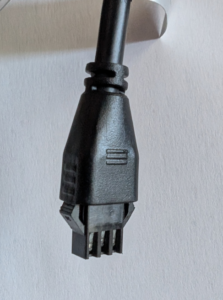
Some LED strips have a new LED connector. It works the same way as the one in Figure 1 above but looks slightly different.
Once powered on there will be a short delay and thenthe lights will turn on a sky blue color. This indicates the Mystic Aurora is ready to go.
If the LEDs first blink red a few times this indicates there was an error of some sort during startup. Most likely this error will only occur if you have entered Wifi Credentials (see section below) and there was a problem connecting to Wifi. Otherwise you should never see the lights blinking red.
Note: that if you have already setup your Mystic Aurora and changed the default startup then the LEDs will come on with whaterver default state you have set. See the sections on Connectin and Setting Defaults
Powering on Multiple Devices
The process for powering up multiple devices only needs to be followed the first time, after that the order does not matter. You can connect all the devices to a single switch after this process is complete.
Power up the first device as described above. Once the LEDs come on in the their default sky blue color then the device is ready to go. Keep this first device powered up and power on a second device. Wait until the LEDs come on in their default sky blue color. Repeat this process for each device making sure to leave each one powered up. Once all your devices are powered on you are ready to go.
If you ever need to reset your devices to the factory settings to repeat this process, there are 2 ways to do this. See the section on Resetting Your Device.
The device is now reset and is set as the Master device.
Resetting Using the User Interface
You can also login to the User Interface and reset ALL powered on Mystic Aurora from there. See the section on connecting to the Mystic Aurora.
Make sure your device or devices are powered on. On the device you wish to use to connect, open the WiFi settings. Look for a device called mystic_aurora . If you have multiple devices you may also see mystic_aurora_1 and so on. You want to connect ONLY to the master device which is the one without any number in the name.
The password to connect to the device is iatbt24127 or iatbt25127
Enter the password and click Connect or whatever your device says. After about 6 to 10 seconds you should be connected, however you will notice that your connection is probably still spinning and spinning for about 30 seconds. This is because the device is looking for the internet which it will never find. Eventually the connection will time out and say something like "Connected, no Internet available" which is exactly what you want. Just know that after about 6 to 10 seconds you are connected to the device and can continue.
Open a browser on whatever device you just connected with and type in one of the following in the URL:
The first option should always work while the second may or may not work depending on your router setup and/or browser security.
It can sometimes take a few attempts to get the Mystic Aurora web page to display. If it doesn't immediately work try refreshing the page. You may also get a notice that the site is unsecure because it does not use HTTPS. Just remember you are connecting to the device sitting right next to you and NOT anything out on the internet, so there are no security concerns.
Once connected you should see an interface like the one shown below in Figure 1.
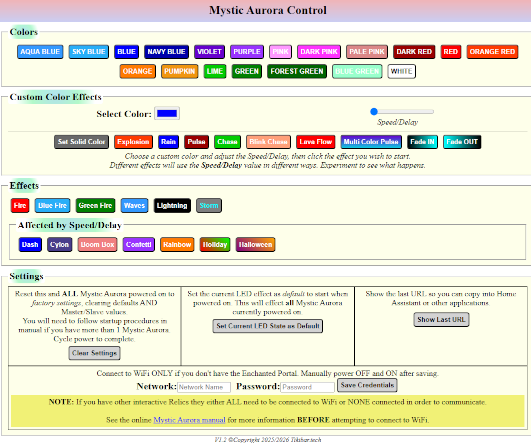
NOTE that older versions of the Mystic Aurora may have a slightly different interface that doesn't include items such as "Show Last URL". These versions are still compatable with Home Assistant or other URL based systems but finding the URL will require using the Developer Interface in whatever browser you are using. If you have questions about this please send me an email at info@tikibar.tech and I'll see if I can help.
Basics of the Interface
Colors
This section simply will set the Mystic Aurora to a predefined color. Just click the button and the LEDs should change. You can choose your own color in the sections that follow.
Note: There is a known bug in earlier versions of the Mystic Aurora where certain colors will display however they will not properly set as defaults. If this happens you can use the Custom Color Effects below to choose your color and set it as a default.
Custom Color Effects
This section contains effects where you can define the color and speed.
Select Color
Click the Select Color color swatch and choose your desired color. Then, for example, click the Set Solid Color button and the LEDs will be set to the chosen color.
You will quickly find that in many cases the color chosen doesn't look like the same when on the LED strip. Rather than go into details I'll just note that these types of LED strips are not really meant to be viewed directly but rather to provide ambient light. That is, light projected on the wall or ceiling. Installing the LEDs, even if just temporaryily, wherever you plan to put them prior to trying to find the correct color will be helpful. You'll just need to play around with the colors until you get the hue you are looking for.
Speed/Delay
Several effects can be modified via the Speed/Delay. For example with the Rain effect the speed will affect how much it is raining. For other effects it's more of a delay between instances of the effect rather than the speed at which the effect takes place. It's best just to play around with this setting and see how it effects change.
Effects
The first row of effects in this section have a defined color that can't be changed.
The second row of effects are affected by the Speed/Delay but have a pre-defined color that can't be changed.
Settings
Here you will find Wifi, defaults, and how to integrate into other systems like Home Assistant.
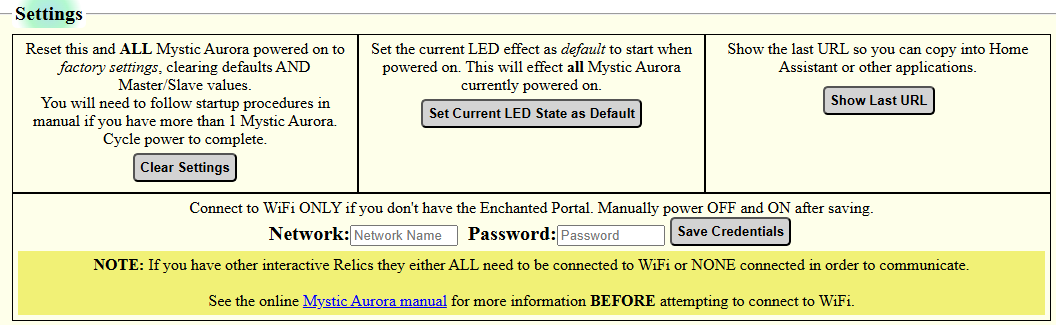
Clear Settings
Use this section to clear the Wifi and any defaults set, basically returning to factory settings. If you have more than one Mystic Aurora make sure they are all one as this will clear ALL of them at once.
Once cleared you will need to follow the Power Up section again to begin using your Mystic Aurora.
Set Current LED State as Default
You can probably guess what this button does, but in case there are any doubts the next time the Mystic Aurora is powered on it will return to whatever the current color/effect is. Use the Clear Settings button to return to the default Sky Blue default.
Show Last URL
If you are using Home Assistant or other URL based systems to control other lights like Phillip's Hue this is the button you will want to use.
This button will display the exact URL that was used to cause the Mystic Aurora to change and do whatever it is doing. This URL can then be plugged into other controllers to integrate the Mystic Aurora into your various show scenes.
While you can get the various URLs you will need without connecting first to Wifi, you will need to connect your Mystic Aurora to your Wifi in order for the effects to be triggered.
If you use any of the current AI to help you, feeding a series of these URLs into it can teach the AI system how to control the Mystic Aurora. It's not an concept easily explained here but I worked with one home bar where this is exactly what he did and it worked great.