
Mt. Tekkioloa Smoking Volcano Guide
VERY IMPORTANT - READ THE USAGE SECTION BEFORE ADDING SMOKE JUICE AND POWERING UP
Smoke Unit
The smoke unit and motor are simple but can also easily be damaged. The smoke unit itself is simply a small heating coil resting on a cotton bed "wick" that soaks up the smoke juice. The heat quickly evaporates the juice and produces smoke.
TOO MUCH SMOKE JUICE WILL DAMAGE THE COIL AS WILL RUNNING THE UNIT WHILE DRY
In this case LESS IS BETTER. You only ever want to put in 1 to 1.5 millilitre (ml) of liquid at a time. One ml is about 1/2 of a standard eyedropper(about 20 drops). Typically smoke juice will come in a bottle with an eyedropper so testing and making a black line on your eyedropper is very useful. This tiny amount will last quite a while. If the unit were on continuously blowing smoke it would last about 15 or 20 minutes. When you consider that the Mt. Tekkioloa volcano spews smoke for about 2 or 3 seconds at a time, that's a long time. Even if you turn the volcano on random mode and let it run for 12 hours you would probably only use about 2 or 3 minutes of smoke time.
No Smoke is Being Produced
Don't immediately assume it's time to add more smoke juice if your unit is not producing smoke. It can sometimes take the unit a bit of use before it really gets going. So to begin with you may not get a lot of noticeable smoke.
Try creating a Scene (see Controlling the Volcano) with several smoke effects in a row and run it a few times and see what happens.
After some use moisture bubbles may also form in the smoke tube, essentially blocking it from producing smoke. Check out the FAQ after you've read through this section.
The quality of smoke juice varies. I've found MEGA-STEAM works great. This is a liquid used in model railroad engines to produce smoke and although it's not cheap and can take a little while to have delivered, you can find it on Amazon or at a local train or hobby store. Additionally it comes in a lot of different scents so you can use it to produce holiday scents or many others in your tiki bar.
You can make your own smoke juice using vegetable glycerin and distilled water. Look online for recipes and see what works for you if you decide to go that route. I've tried distilled water and glycerin to limited success and always fall back on purchasing something as it just works better.
How do I Add Smoke Juice?
NEVER PULL ON THE FILLER TUBE. IF IT COMES LOOSE YOU WILL NOT BE ABLE TO ADD JUICE.
There is a small tube behind the mini volcano on the side of Mt. Tekkioloa. Gently remove the mini volcano to find it. The tube has a black cap on the end to prevent smoke from exiting and forcing it all to the main volcano crater. The tube is glued to the proper input hole on the smoke unit however it can still come loose over time if you pull on it so DON'T PULL OR PUSH THIS TUBE.
GRIP THE TUBE BELOW THE END CAP BEFORE TRYING TO REMOVE THE CAP
The end cap may not come off easily so gripping the tube below the cap will prevent you from yanking on the tube. Fill your eyedropper to the line you should have drawn when you figured out how much 1ml of liquid is. If you haven't dont that yet do that first. Once you have the desired amount of juice in the eyedropper, gently touch the end of the eyedropper to the end of the tube. Squeeze the eyedropper to push the liquid into the tube.
GRIP THE TUBE BELOW THE END CAP BEFORE TRYING TO REMOVE THE EYEDROPPER
The end of the eyedropper tends to stick in the tube SO DON'T PULL IT OUT OR YOU MAY PULL OUT THE TUBE. Grip the tube below the eyedropper before attempting to pull the eyedropper out.
REMOVE THE END OF THE EYEDROPPER FROM THE END OF THE TUBE BEFORE RELEASING THE SQUEEZE
If you keep the eyedropper toucing the end of the tube the suction from releasing the squeeze may pull the liquid back up the tube, preventing it from going into the unit. Release the squeeze and then place the eyedropper back to the end of the tube and then squeeze again, pushing air into the tube. This will push the liquid through the tube and into the unit. You only need to do this once or maybe twice.
How do I know when to refill?
As mentioned above don't immediately assume it's time to refill if you start getting less smoke produced. Give it a little time and run some tests (see Controlling the Volcano). Check out the FAQ and try the methods there first.
If you do believe it's time to add some juice only add about 1/2 the normal amount, wait 10 minutes, and then try it and see what happens. If you immediately start getting nice, thick smoke than it probably was time to add juice so add the other 1/2 ml. I've also seen that I may have to wait an hour or more after adding smoke juice before it really starts working well. This is likely because it was running pretty dry so it will take a little time for the wick to soak up juice.
Can I run the volcano WITHOUT SMOKE JUICE?
You can run without smoke juice only if you TURN OFF THE SMOKE effect. This can be done by connecting to the unit and turning off the smoker. (See Controlling the Volcano). The lava effects and interactions with other relics like the Mystic Aurora LEDs will continue to work.
Powering on Mt. Tekkioloa
ONLY USE THE PROVIDED POWER SUPPLY OR AN EQUIVALENT VOLTAGE AND AMPERAGE. 6v 5Amp
IMPORTANT: By default Mt. Tekkioloa is in RANDOM MODE with the SMOKER TURNED ON. During my testing I add some smoke juice to the unit so it should not be dry to begin.
Okay, after all the lessons on the smoker it's finally time to plug the thing in. Plug the provided power supply into the jack on the side. The volcano will blink different colors depending on the result.
- BLUE blinks indicate the unit has powered up successfully and is ready to go
- GREEN blinks indicate the unit has powerd up and connected to the Enchanted Portal or your local Wifi
- RED blinks indicated the unit tried to connect to your local Wifi but something went wrong. If this happens the volcano will fall back to just normal operation, the same as BLUE blinks.
You should also hear the motor kick on for a second with a low hum. This is just a normal motor test and means everything is working properly.
Power up the volcano and wait for it to blink BLUE several times. If it blinks GREEN or RED see the section below on connecting to WiFi
Open up the Wifi settings on whatever device you want to connect with and search for the network named
tbt_volcano
Connect using the password
iatbt26127
You should be connected in about 6 to 8 seconds however you will likely continue to see your connection dialog spinning as if it cannot find the network. What is happening is that the connection is looking for the internet, which it will never find, and is just spinning. It will eventually say something like "Connected: No Internet Availalbe" or something like that. As mentioned after about 6 to 8 seconds you are actually connected so you don't have to wait for it to time out and give you the message.
Once connected, open up a browser and type the following in the URL
172.27.1.170
This is the IP address of the volcano that you just connected to. At this point, depending on your network security settings, you will probably get a warning like "This site does not support SSH and your data may not be secure". This is expected. Since we are not connected to the internet your data isn't going anywhere nor is any data ever requested.
Once connected you should see a web page. If the page does not fulling load try refreshing the browser a few times.
If you get an error, see the FAQ on connection problems. The most likely cause is a setting in your browser, your firewall, or your router, so see if information there helps.
Connecting Mt. Tekkioloa to your Wifi
- If you don't have the Enchanted Portal and wish use Home Assistant or some other controller, you'll need to connect Mt. Tekkioloa to your Wifi. Connect as described above and then look for the Settings section on the webpage displayed.
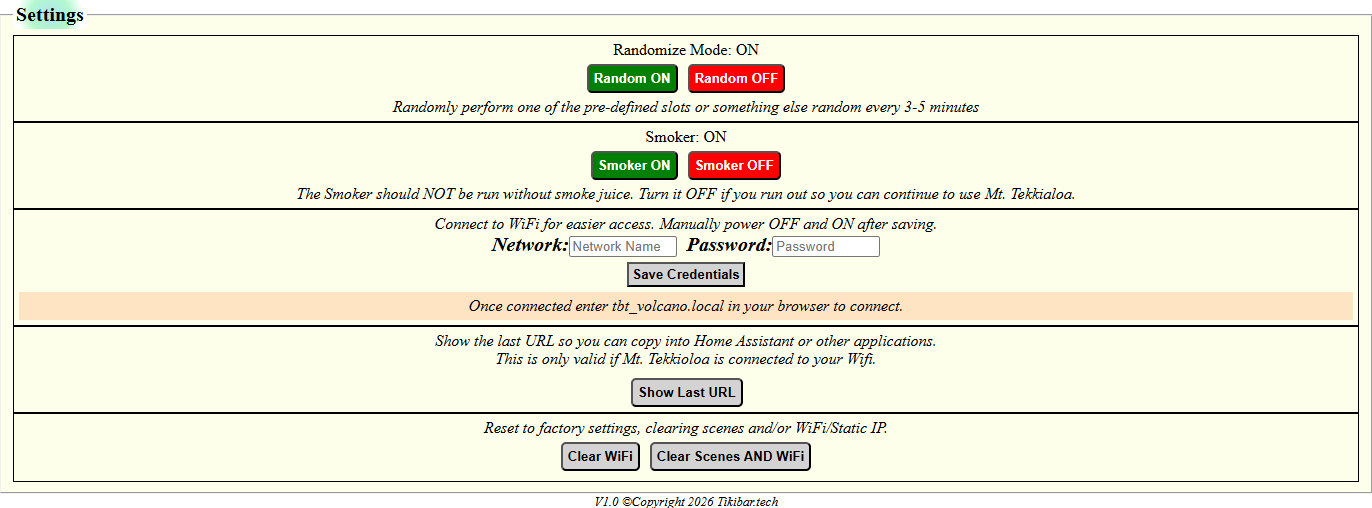
Figure 1
Enter your network name and password (remember that BOTH are case sensitive) and click Save Credentials. You should get a message that the credentials have been saved.
Now power off Mt. Tekkioloa, wait a few seconds, and then power it back on. After a few seconds the volcano should blink GREEN a few times and you are connected. If the volcano blinks RED then you entered either the network name or password incorrectly to connect again as described in the previous section and try again.
If you have successfully connected to your Wifi, and assuming whatever device you are on is connected to that same Wifi, you can open a browser and type in
tbt_volcano.local
This is instead of typing in 172.27.1.170 and should display the same webpage you previously saw. It's possible you get an error depending on what type of security you have setup so consult the FAQ if you do. Once connected to your Wifi the 172.27.1.170 will no longer work.
Clear Wifi
To clear the Wifi username and password so the Enchanted Portal (if you have it) is found again, use the Clear Wifi button in the settings section of the page and then power off and then back on.
You can create scenes that utilize the lights and smoke in the volcano as well as the Mystic Aurora LEDs.
IMPORTANT: While creating and testing scenes you should TURN RANDOMIZE OFF.
Ideally you should also connect the Volcano to Wifi and control it that way. Randomize is...well...random! So it may start doing something while you are in the middle of creating or testing a scene.
If the volcano recognizes that you have the Enchanted Portal it may try and connect to it to trigger an action, and if so it will disconnect your device and you will lose anything you have not saved if you are not Wifi connected.
To start controlling the volcano you'll need to connect to the volano as described in Connecting to Mt. Tekkioloa.
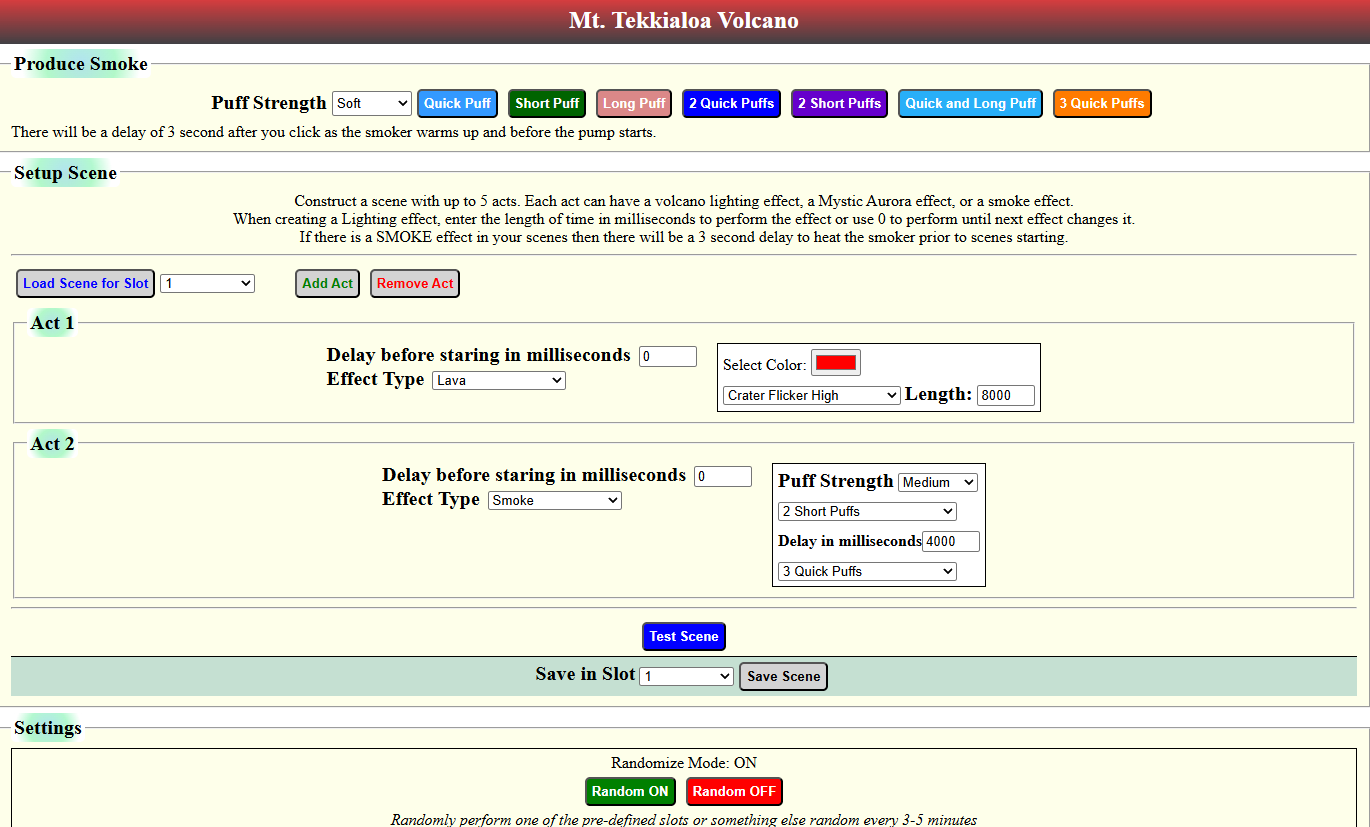
Figure 1
Note that there is more to the Settings section but that will be described in more detail below.
Produce Smoke
This section is really just a way to test the volcano and see what the different types of smoke effects do.
Puff Strength - Choose the strength of the blower motor and then click the effect you want to trigger. Medium strength is usually the ideal, however you can use the vaious strengths to get differing effects.
Setup Scene
A scene is a series of triggered effects. A scene is made up of up to 5 acts and each act can have one of three different types of effects.
To add an act click the Add Act button. To remove the last act added, click the Remove Act button.
Delay before starting in milliseconds
Oddly enough this is exactly what it says. If you put in 5000 (5 seconds) then once your Scene is triggered there will be a delay of this length before the first effect begins. This could be useful if you are triggering the volcano from Home Assistant or some other controller and trying to time it with some other effects.
Note that Smoke effects have a built in delay so see that section for more info.
Effect Types
- Lava - This controls either the red light in the crater or the lights on the interior of the volcano. IE the lava flow.
- Smoke - This controls the smoking of the volcano
- Mystic Aurora LED - If you have the Mystic Aurora LEDs you can trigger various effects in those.
Length
This defines the length of the given effect in milliseconds. So if you were to enter 7500 for a Crater Flicker High effect, the effect would last for 7.5 seconds and then stop.
Lava Effects
- Crater Flicker High - Pulse the light in the crater from very low to very bright
- Crater Flicker Medium - Pulse the light in the crater from lowish to brightish
- Crater Flicker Low - Pulse the light in the crater so that is just varies a little bit
- Lava Flow - make it appear as if lava is moving down the side of the volcano
- Fire - A sparking and undulating fire effect
- Pulse - Slowly get dimmer and dimmer until off and then back on brighter and brighter.
- Rain - Simulating rain drops that light up and fade out, producing an interesting look
- Confetti - Fun and colorful confetti bursts of light.
For Lava Flow, Fire, Pulse, and Rain the default is RED however you can choose a different color if you wish. Who am I to determine what color lava is flowing in your volcano! Just click the Select Color box and choose your color. You'll notice that you don't always get the color you have chosen. LEDs are funny things and you'll have to play around with the color wheel to dial in whatever you are looking for.
Smoke Effects
Smoke effects have a built-in 3 second delay which is just enough time to allow the smoke unit to warm up and produce smoke. So keep this in mind if you are using delays to setup timing of some sort.
Each smoke effect allows you to choose the Puff Strength and to put in up to 2 different effects of those listed at the top of the page. The Puff Strength will apply to both of the smokes. Hence the need for the Produce Smoke section at the top of the page that allows you to see what each effect does.
The Delay in Milliseconds field is the time between each of the chosen effects. The maximum length in this field is 9999, essentially 10 seconds. If you need to have a longer delay, just use the first smoke effect and then add another Act with another smoke effect.
Note that there is an anomoly in the page that will allow you to click the UP arrow in the Delay field and increment the delay above 9999. DO NOT DO THIS AS IT COULD CAUSE DAMAGE TO THE SMOKE UNIT.
Mystic Aurora LED
This type of effect will trigger the Mystic Aurora LEDs to do something. There are few things to be aware of when using this type of effect.
Firstly a Length of 0 (Zero) indicates that the effect will last forever, so only use 0 to change the color of the LEDs until the next time an effect begins. Also note that the LAVA effect, in this instance, is a forever effect. That is no matter what you put into the Length field the Lava effect will occur on the Mystic Aurora until the next effect is triggered. So if you want to turn on the Lava flow on the Mystic Aurora but then have it change back to something after a given time, you would do it like this.
Testing Scenes
Once you have created a scene you can click the Test Scene button to try it out. Make sure the volcano is not presently doing anything else or else the test will be ignored. You will receive a message if the scene is set to start immediately. If you do not immediately receive a message, wait until you either DO receive a message even if it is an error. Then try again.
Saving and Retrieving Scen
Once you are happy with your scene choose a slot from the Save in Slot pulldown and click Save Scene. Again make sure the volcano is not in the middle of doing anything else or your scene may not save properly.
To retrieve a previously saved scene, choose the slot number from the pulldown next to Load Scene for Slot and then click the Load button. If the scene is loaded sucessfully you will see it appear. If there is nothing to load you will get a message indicating such.
Scene Example 1
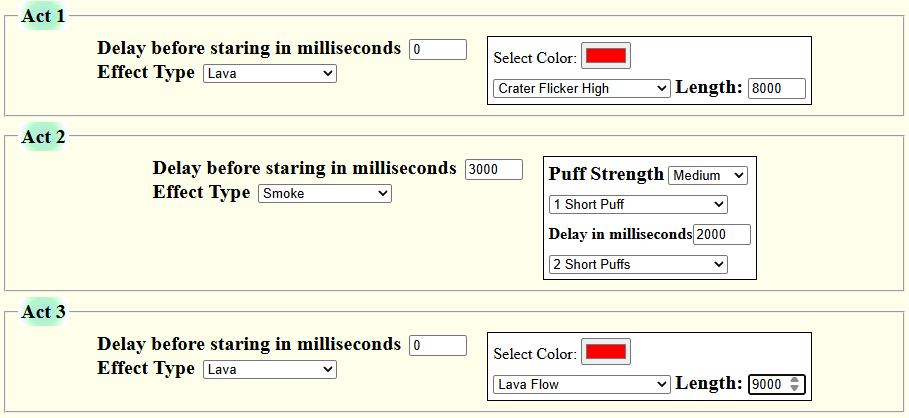
This scene will start by having the light inside the crater flicker wildly. It will stop flickering after 8 seconds however Act 2 will begin immediately.
Since we have put in a 3000ms (3 seconds) delay before starting, Act 2 will not start immediately. After the indicated delay there will be a short puff of smoke at medium strength. After a 2 second delay there will be 2 short puffs of smoke.
Immediately afterwards the lights inside the volcano will begin to flow red as if lava is flowing from down the volcano. This will last for 10 seconds and then stop.
Scene Example 2
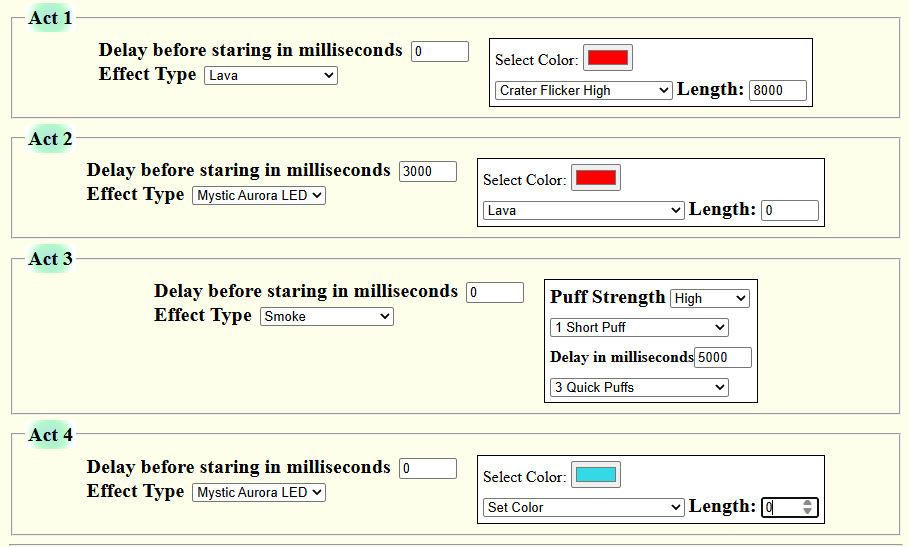
This scene will start by having the light inside the crater flicker wildly. It will stop flickering after 8 seconds however Act 2 will begin immediately.
Since we have put in a 3000ms (3 seconds) delay before starting, Act 2 will not start immediately. After the indicated delay the Mystic Aurora LEDs should begin to lava flow. This is a forever effect so even if we put a value in Length it will continue until something else stops it.
Immediately afterwards the Mystic Aurora beings there will be 1 big puff of smoke, followed by a 5 second delay and the 3 quick puffs of smoke.
Immediately after that the Mystic Aurora LEDs will change to a blue color and remain blue until something changes them.
Scene Example 3
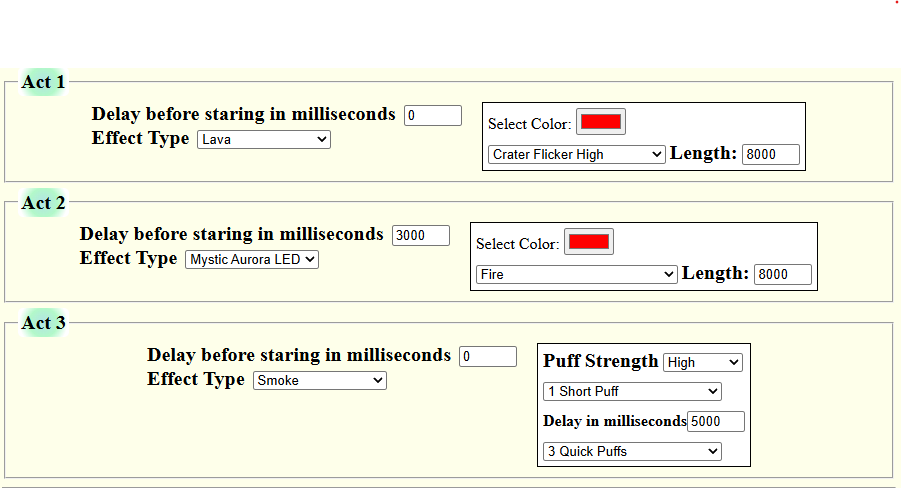
This scene will start by having the light inside the crater flicker wildly. It will stop flickering after 8 seconds however Act 2 will begin immediately.
After a 3 second delay the Mystic Aurora LEDs will turn to red fire and flicker. This effect will last for 8 seconds and the Mystic Aurora LEDs will return to whatever they were doing before the Fire effect began.
Immediately after the LEDs begin there will a big puff of smoke, a 5 second delay, and the 3 quick puffs of smoke.
Settings
Settings control things like connecting to Wifi, clearing saved scenes and turning features on and off.
Randomize Mode
This setting defaults to ON and will make the volano trigger random effects every few minutes. It could be just a flicker of the crater, a puff of smoke, or some short or extended sequence of lights and smoke. It may even trigger the volcanic eruption on the Enchanted Portal or a Mystic Aurora LED effect, or all of the above.
use the Random On or Random Off button to set this feature.
Note that Randomize will also randomly perform scenes that have been user defined and saved, if there are any. So don't be surprised to see scenes that you designed showing up in Random mode.
Smoker On/Off
If you wish the run the volcano WITHOUT smoke, or if you run out of smoke juice but still wish to have the volcano active, you can turn the smoke feature OFF or ON using these buttons.
Connecting to Wifi
This feature was covered in the Connecting to Mt. Tekkioloa section.
Show Last URL
If you are designing a scene to be triggered by Home Assistant or another URL based controller, you'll want to use this button immediately after you click Test Scene.
Clicking this button will display the full URL that you will need to plug into your home controller in order to trigger the volcano. Remember that the volcano must be connected to your home Wifi in order for this feature to work.
Clear Wifi & Clear Scenes and Wifi
These buttons are pretty self explanatory. If you are connected to Wifi but wish to NOT be connected, click the Clear Wifi button and cycle the power OFF and then back ON. If you wish to clear both Wifi AND all the scenes saved, click the Clear Scenes and Wifi button.