
Relic Amplifier Guide
Power on the Device
Once the device is powered up the jewel atop the tiki head will turn solid BLUE. This indicates the device is searching for the Enchanted Portal. If the portal is found the jewel will blink GREEN several times and then turn to flickering like fire. If the portal is NOT found the jewel will blink red several times and then return to a pulsing color. If you have powered on the amplifier BEFORE powering on the Enchanted Portal then you will need to cycle the power OFF and then ON on the relic amplifier.
Placing a Relic on the Amplifier
When placing a relic on the amplifier you should place it towards the middle of the amplifier. If the relic is recognized then the jewel will blink a lblue color several times. The jewel will then turn solid blue while the Enchanted Portal is contacted. The jewel will blink GREEN if the portal was contacted successfully or RED if the operation failed for some reason. If the operation fails try it again and see if the same thing happens. If it does simply power the device OFF and then back ON and make sure the jewel blinks GREEN to indicate the portal has been found.
NOTE: USB-C to USB-C cables may not power up the device. Basically consider the relic amplifier a dumb device, as opposed to your smart phone which will trigger the USB-C cable to begin charging when plugged in. If you find this to be the case try using a USB-A to USB-C cable like the one shown below.
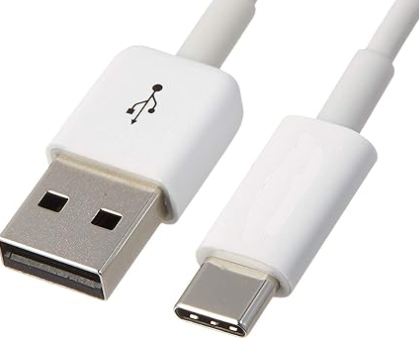
USB-A to USB-C Cable
To power on the device press in the button on the side. The button should click and remain pressed in. The flame atop the temple pillar should light up indicating the device is looking for the Enchanted Portal. If the flame does not light up press the button again to turn off the device and then immediately press it again to turn it back on. The device should now power on. This is normal and I could explain that the micro controller requires more power to boot than it does to run so sometimes the On-Off-On is required, but I won't bore you with details. 🙂
To power OFF the device, press and release the button on the side. The button should pop out and the device will power off.
Rechargeable Battery Power
The device may also be powered by a 3.7v lithium ion rechargeable battery.
NEVER USER A BATTERY WITH MORE THAN 3.7v as it will damage the device.
To access the battery compartment unscrew the 2 screws on the bottom of the device. Use caution when you flip the device over so as not to bang the stone pillar or the clear flame at the top as this could damage them. Once the compartment is open there will be a JST-PH 2.0 type plug available . This is the most common plug type for batteries of this size but there are others. So when purchasing a battery be sure and look for JST-PH 2.0 and 3.7v. The mAh (milliampere-hour) of the battery only matters in that larger values provide longer life. For example a 5200mAh battery will last longer than a 3000mAh battery.
The size of the battery obviously matters as well. Be sure and get a battery small enough to fit inside the compartment, otherwise you may as well just use a large battery and connect to the USB-C port on the back. A battery with the following dimensions will fit with room to spare.
2.65 x 1.46 x 0.75 Inches
You can find batteries that meet these criteria on Amazon and other sites. Here is a link to one such battery.
IMPORTANT!!!! ALWAYS check that the RED and BLACK wires of the battery connector match. Installing a battery with the wires reversed will destroy the device!! See section below for more details.
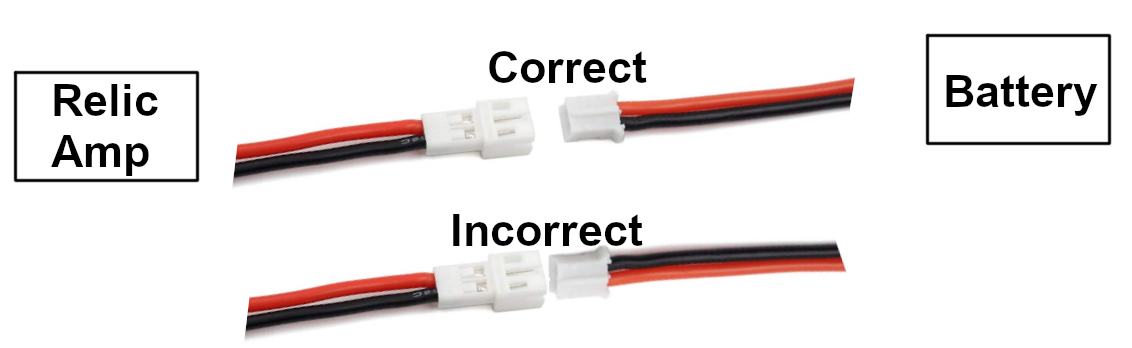
If you receive a battery with the wires reversed it is quite easy to fix. Check out the FAQ->Relic Amplifier->Rechargeable Battery for instructions on how to swap the wires.
Once a compatible battery is plugged in, there is a tiny, hidden button on the back of the rocks on the far right above the USB-C port. Gently press the button to switch the device from USB-C power to battery power. You should see RED LEDs light up inside the rock. You will still need to press in the larger power button on the side to turn on the device.
Turning the device OFF and then ON again will return to the default USB-C power.
IMPORTANT: Before connecting a battery of this type always make sure the RED and BLACK wires match up. Some batteries come with the plug wires reversed (I know, it's annoying) and connecting a battery with the wires reversed WILL DAMAGE THE DEVICE. Unfortunately the battery description usually does not indicate in which configuration the wired connector is setup though many do show a picture (that may or may not be accurate). The connection on the Relic Amplifier is in the most common configuration. I have found on Amazon that reading other people's reviews of the battery they will often say something like "the wires are reversed on this battery so be aware of that" or something along those lines. Fortunately Amazon has a great return policy so if you get a battery that has the wires reversed you can return it and try again.
See the Battery FAQ for information on how to change the connector if you get one that is backwards!
Charging the Battery
NEVER LEAVE THE BATTERY CHARGING OVERNIGHT
While the charging board has built-in functions to assure the battery does not overcharge, the last thing we want to happen is to ruin the battery or worse have it overheat and catch fire. Scary, yes, and it's not likely to happen, however better safe than sorry. If you leave the battery inside for a long time over many charges, open the compartment every now and again and inspect the battery to make sure nothing unusual is going on.
The battery will charge via the USB-C port on the device when it is plugged in. You may turn the relic amplifier on and use it while the battery is charging. There are 4 tiny red LEDs in the rock above the USB-C port (on the right). Each LED represents 25% charge and the current charging percentage LED will blink. E.G. if the battery is 50% charged and it is charging on the next 25% (50 - 75) the 3rd LED will be blinking. It is difficult to tell exactly which LED is blinking because of the location of the charging board, however you should be able to get a general idea.
Note that even with no battery plugged in you may still see the red LED blinking.
Powering Up the Relic Amplifier
Once the device is powered up the flame atop the pillar will turn solid BLUE. This indicates the device is searching for the Enchanted Portal. If the portal is found the flame will blink GREEN several times and then turn to flickering like fire. If the portal is NOT found the flame will blink a violet color several times and then return to a flickering flame. If you have powered on the amplifier BEFORE powering on the Enchanted Portal then you will need to cycle the power OFF and then ON on the relic amplifier.
Placing a Relic on the Relic Amplifier
When placing a relic on the amplifier you should place it towards the middle of the amplifier. If the relic is recognized then the flame will blink a light blue color several times. The flame will then turn solid blue while the Enchanted Portal is contacted. The flame will blink GREEN if the portal was contacted successfully or VIOLET if the operation failed for some reason. If the operation fails try it again and see if the same thing happens. If it does simply power the device OFF and then back ON and make sure the flame blinks GREEN to indicate the portal has been found.
Version 1.0 vs 2.0
The main difference between the two versions is that version 2.0 is interactive. That is, it will cause other relics apart from the Enchanted portal to do things. Additionally when other relics are triggered the light on the version 2.0 relic amplifier will change to mimic whatever is going on. For example if there is an explosion it will flicker and blink like an explosion. If there is a STORM going on it will flicker blue like rain drops and flash white light lightning, etc.
Until you have other interactive relics there is no real reason to upgrade. However if you do have other interactive relics and would like to upgrade, please drop us an email and we can offer an easy upgrade path.
Power Up the Relic Amplifier
Once the device is powered up the jewel atop the tiki head will turn solid BLUE. This indicates the device is searching for the Enchanted Portal. If the portal is found the jewel will blink GREEN several times and then turn to flickering like fire. If the portal is NOT found the jewel will blink a violet color several times and then return to a flickering flame. If you have powered on the amplifier BEFORE powering on the Enchanted Portal then you will need to cycle the power OFF and then ON on the relic amplifier.
Placing a Relic on the Relic Amplifier
When placing a relic on the amplifier you should place it towards the middle of the amplifier. If the relic is recognized then the jewel will blink a light blue color several times. The jewel will then turn solid blue while the Enchanted Portal is contacted. The jewel will blink GREEN if the portal was contacted successfully or VIOLET if the operation failed for some reason. If the operation fails try it again and see if the same thing happens. If it does simply power the device OFF and then back ON and make sure the jewel blinks GREEN to indicate the portal has been found.
Day, Sunset, Night
While the Day relic has no special considerations, both the Sunset and Night relics do. A torch lighting ceremony takes place when you switch to Sunset or Night, during which other relics are ignored. The sunset ceremony ends when all the torches are lit, while the night ceremony ends once the green light on the tiki hut lights up.
If you use a relic during the ceremony you may see an hourglass appear, indicating you will need to wait until the ceremony completes. Depending on the relic used, the effect may automatically trigger once the ceremony ends or you may have to use the relic again.
Volcano
The volcano relic will make Mt.Tekkiowakka erupt during any time of day or weather. It is important to remember that once the volcano starts erupting it will remain in eruption mode and continue erupting about once every 5 minutes. To stop the eruption, change the time of day or weather. You can even change to the same time of day.
This is important because certain effects don't work during an eruption. You may try to explode the crate on the island, for example(using the Unstable Cargo or Unstable Tippy Cargo relic), but it won't work while the portal is in eruption mode.
Hekili Ino - The Storm God
When a storm is triggered it will take 30 or 40 seconds for the storm to roll in. First the clouds appear and then the wind picks up. Finally the rain comes. Until the rain begins, other relics will be ignored.
Release the Kraken
Betty, the lagoon's resident Kraken, is a bit shy and only comes out at certain times. These times are listed below:
- Daytime Storm
- Sunset Storm
- Night Time Clear Skies
The kraken sequence is over a minute long and it will take Betty 10 to 20 seconds before she appears, so be patient. During this effect other relics will be ignored.